Using DIBS
This page describes how DIBS works from the standpoint of the user interface as seen by patrons and staff. A separate section in this document describes the system architecture that implements the functionality described here.
Authentication
Authentication is assumed to be handled by the system hosting DIBS. In Caltech’s case, we use Shibboleth, an institute-wide, single sign-on system (SSO) for authentication. This means that before users ever reach DIBS, a sign-in page is presented by the web server. The screenshot below shows an example of this:
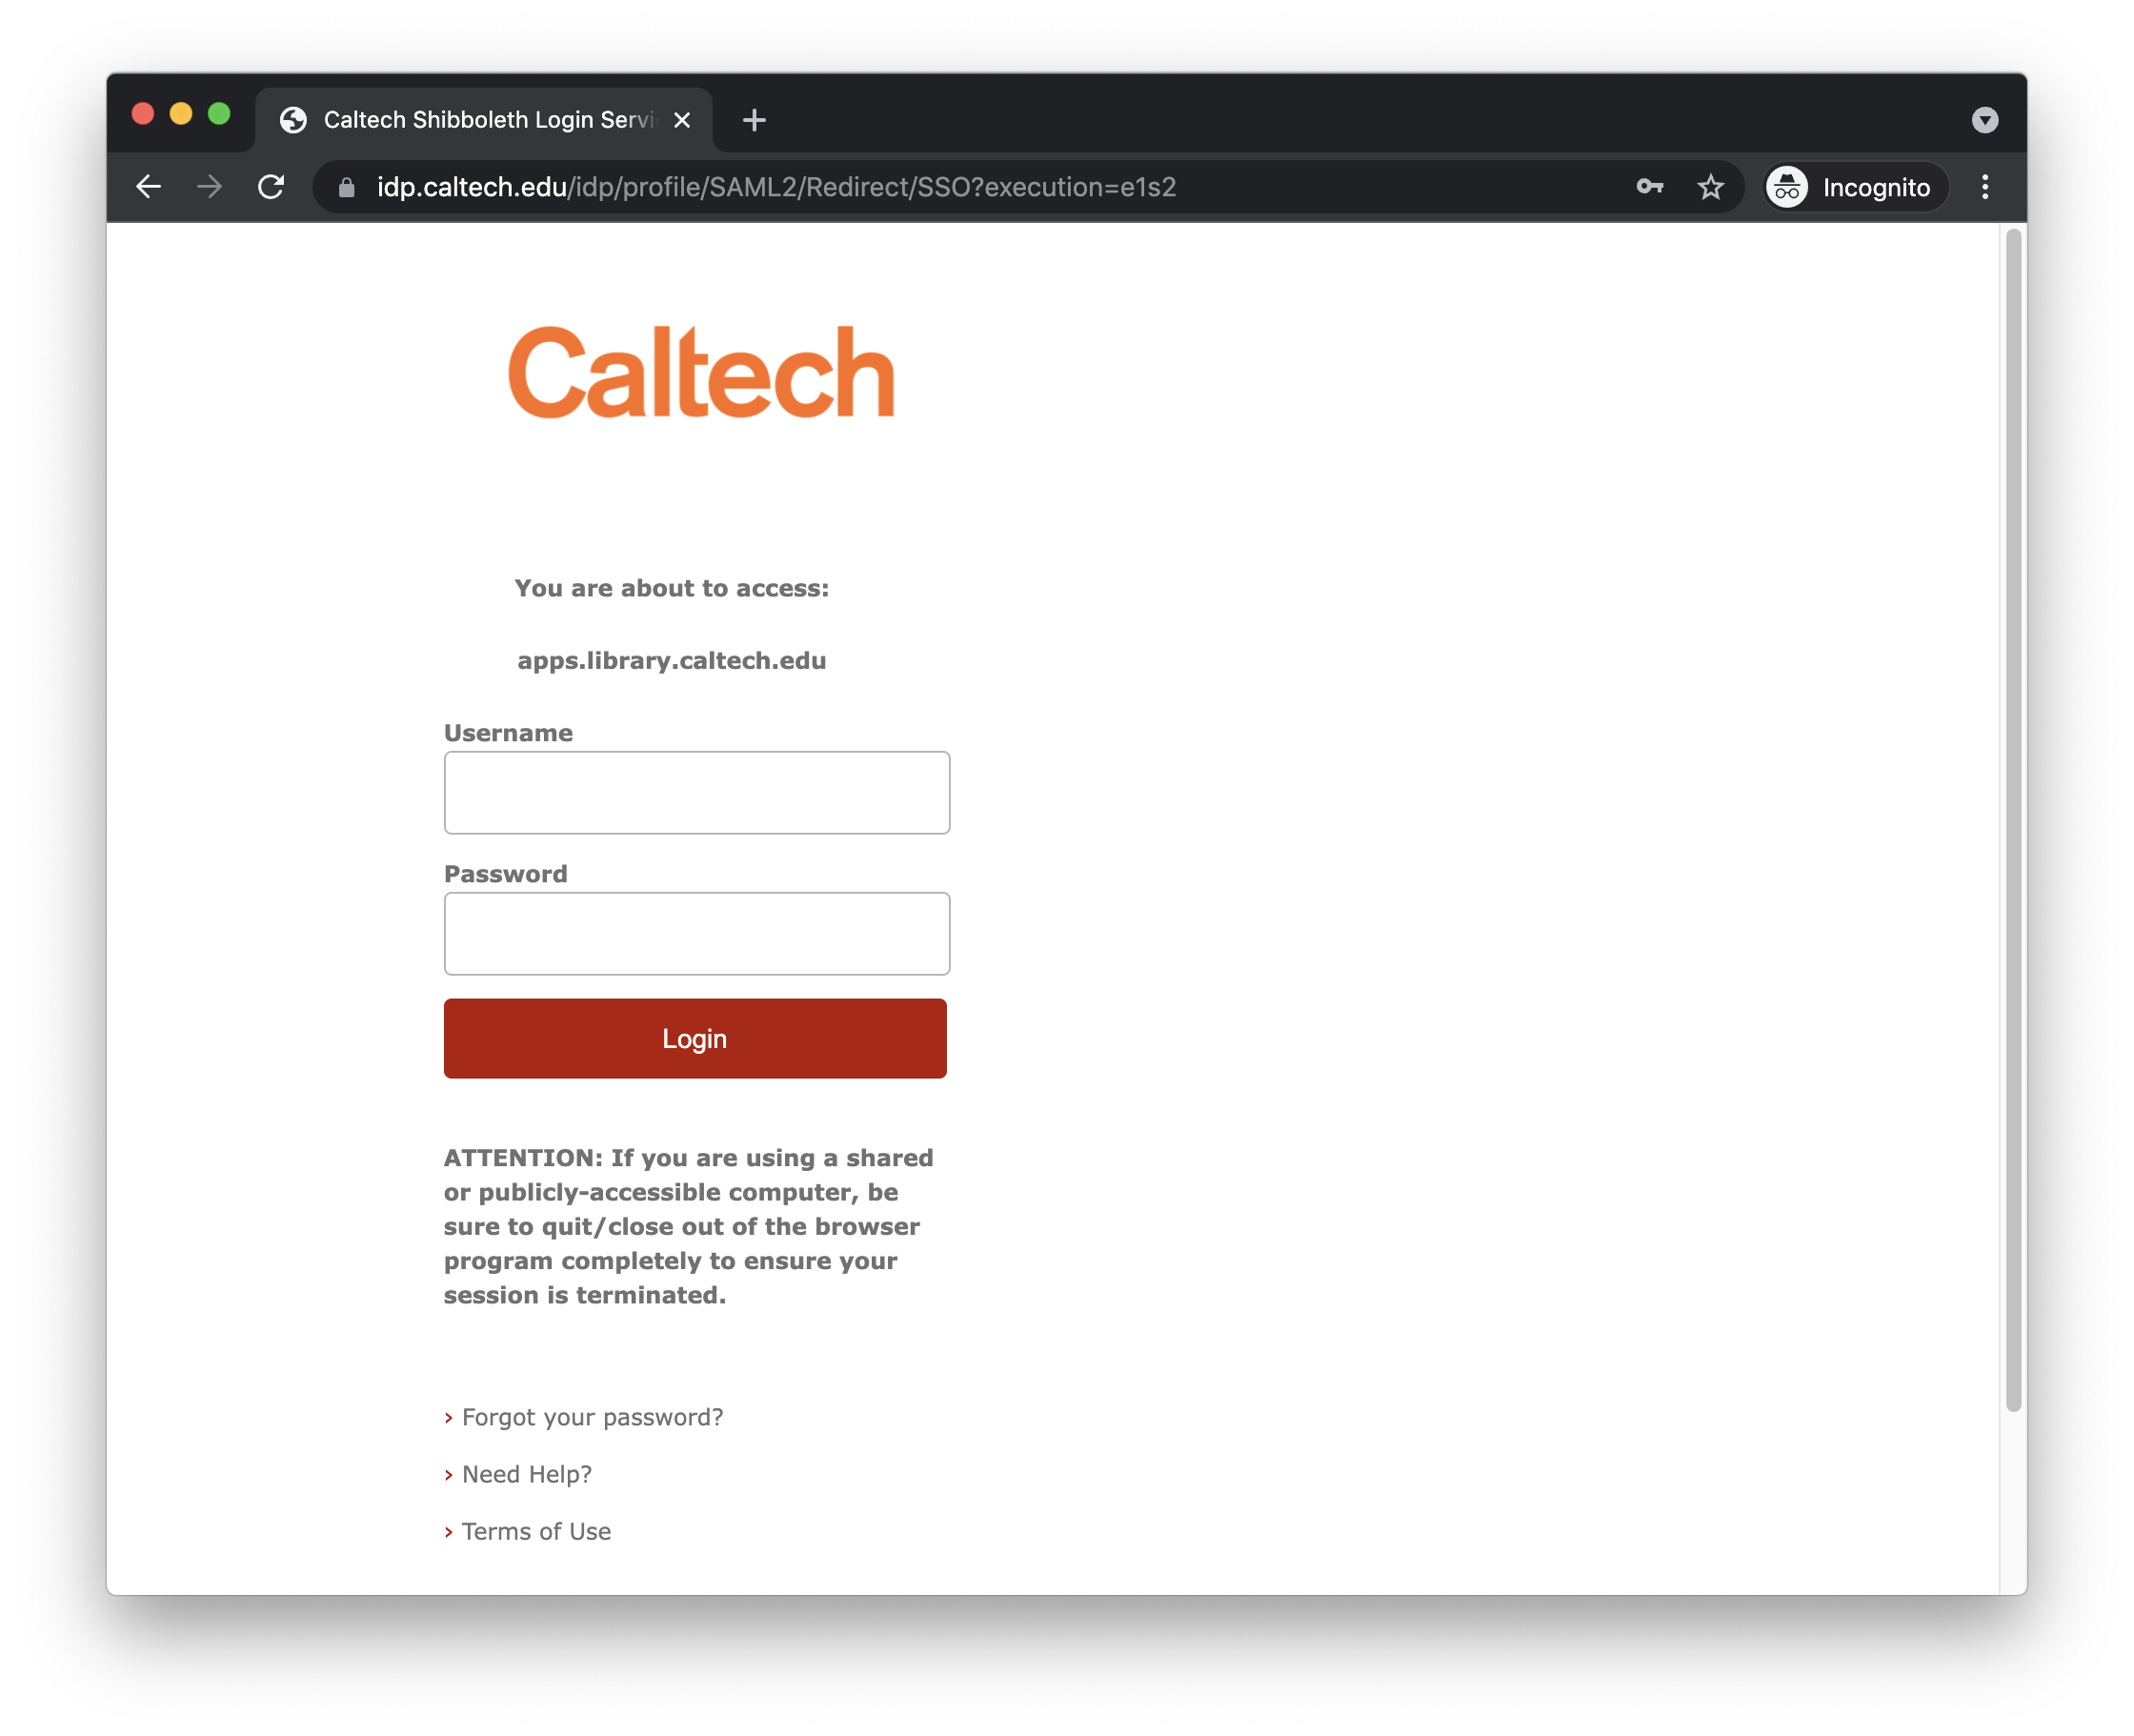
DIBS itself does not do anything beyond distinguishing between regular users and those who have staff privileges (discussed below). This distinction is made based on the identity of the user as conveyed by the SSO system. DIBS does not ask for user login credentials nor store them.
Front page
The current design of DIBS is focused on helping instructors and students enrolled in classes. DIBS provides fairly distinct experiences for patrons on the one hand, and staff on the other; this separation is due to expectations about how different classes of users will interact with the system:
We expect that patrons will be informed about the availability of specific items via course syllabi or similar resources produced by course instructors. Consequently, DIBS does not currently expose to patrons a separate index of “all things available for digital loan”. In part, this is because we expect patrons will be directly informed about the pages describing individual items, and in part because we anticipate that in the future we will add DIBS links directly to Caltech’s FOLIO-based catalog.
We expect that library staff need to interact with the system in a different way: not to read the materials, but to manage the items in the database of digitized works and control loan parameters. Thus, staff do see a list of all items available through the system, but access to this list is limited to Library staff.
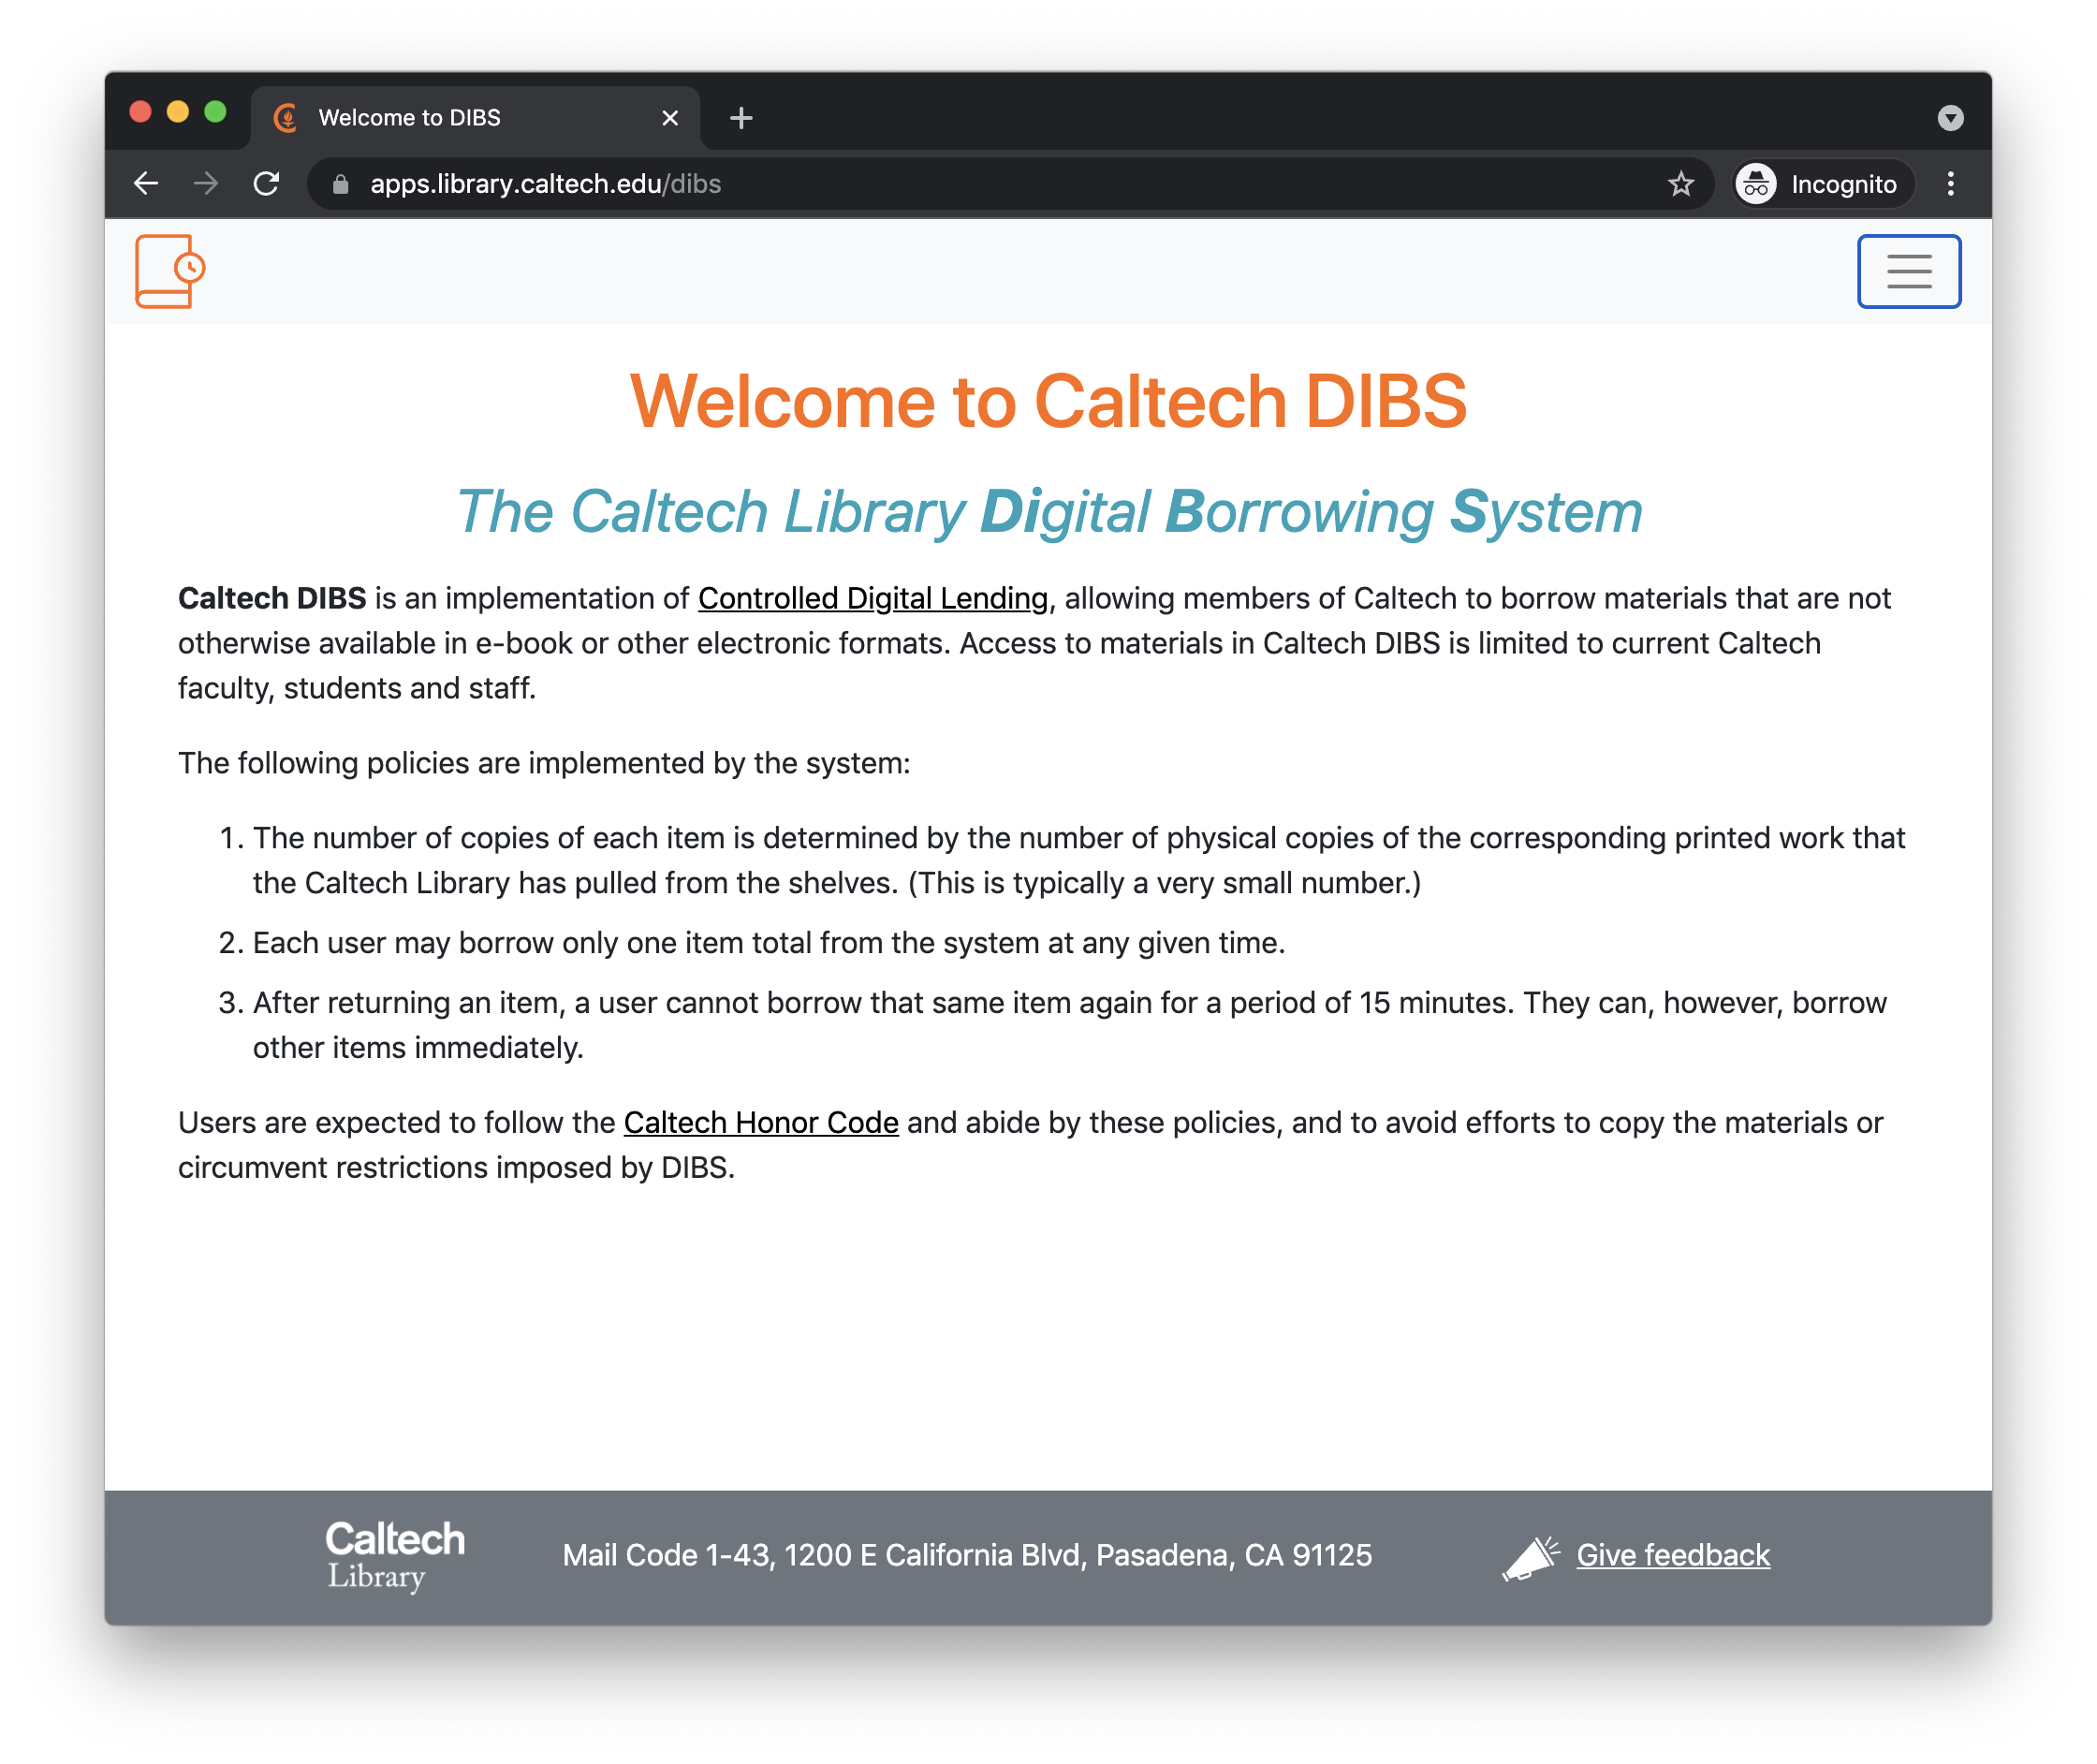
These considerations explain the front page of DIBS, which (perhaps contrary to expectations) lacks an index or listing of all items in DIBS. This is because in normal use, we expect that users will go straight either to a page describing an individual item or to a DIBS management page. The front page acts mainly as an information page that describes the purpose of the system and the loan policies:
The patron experience
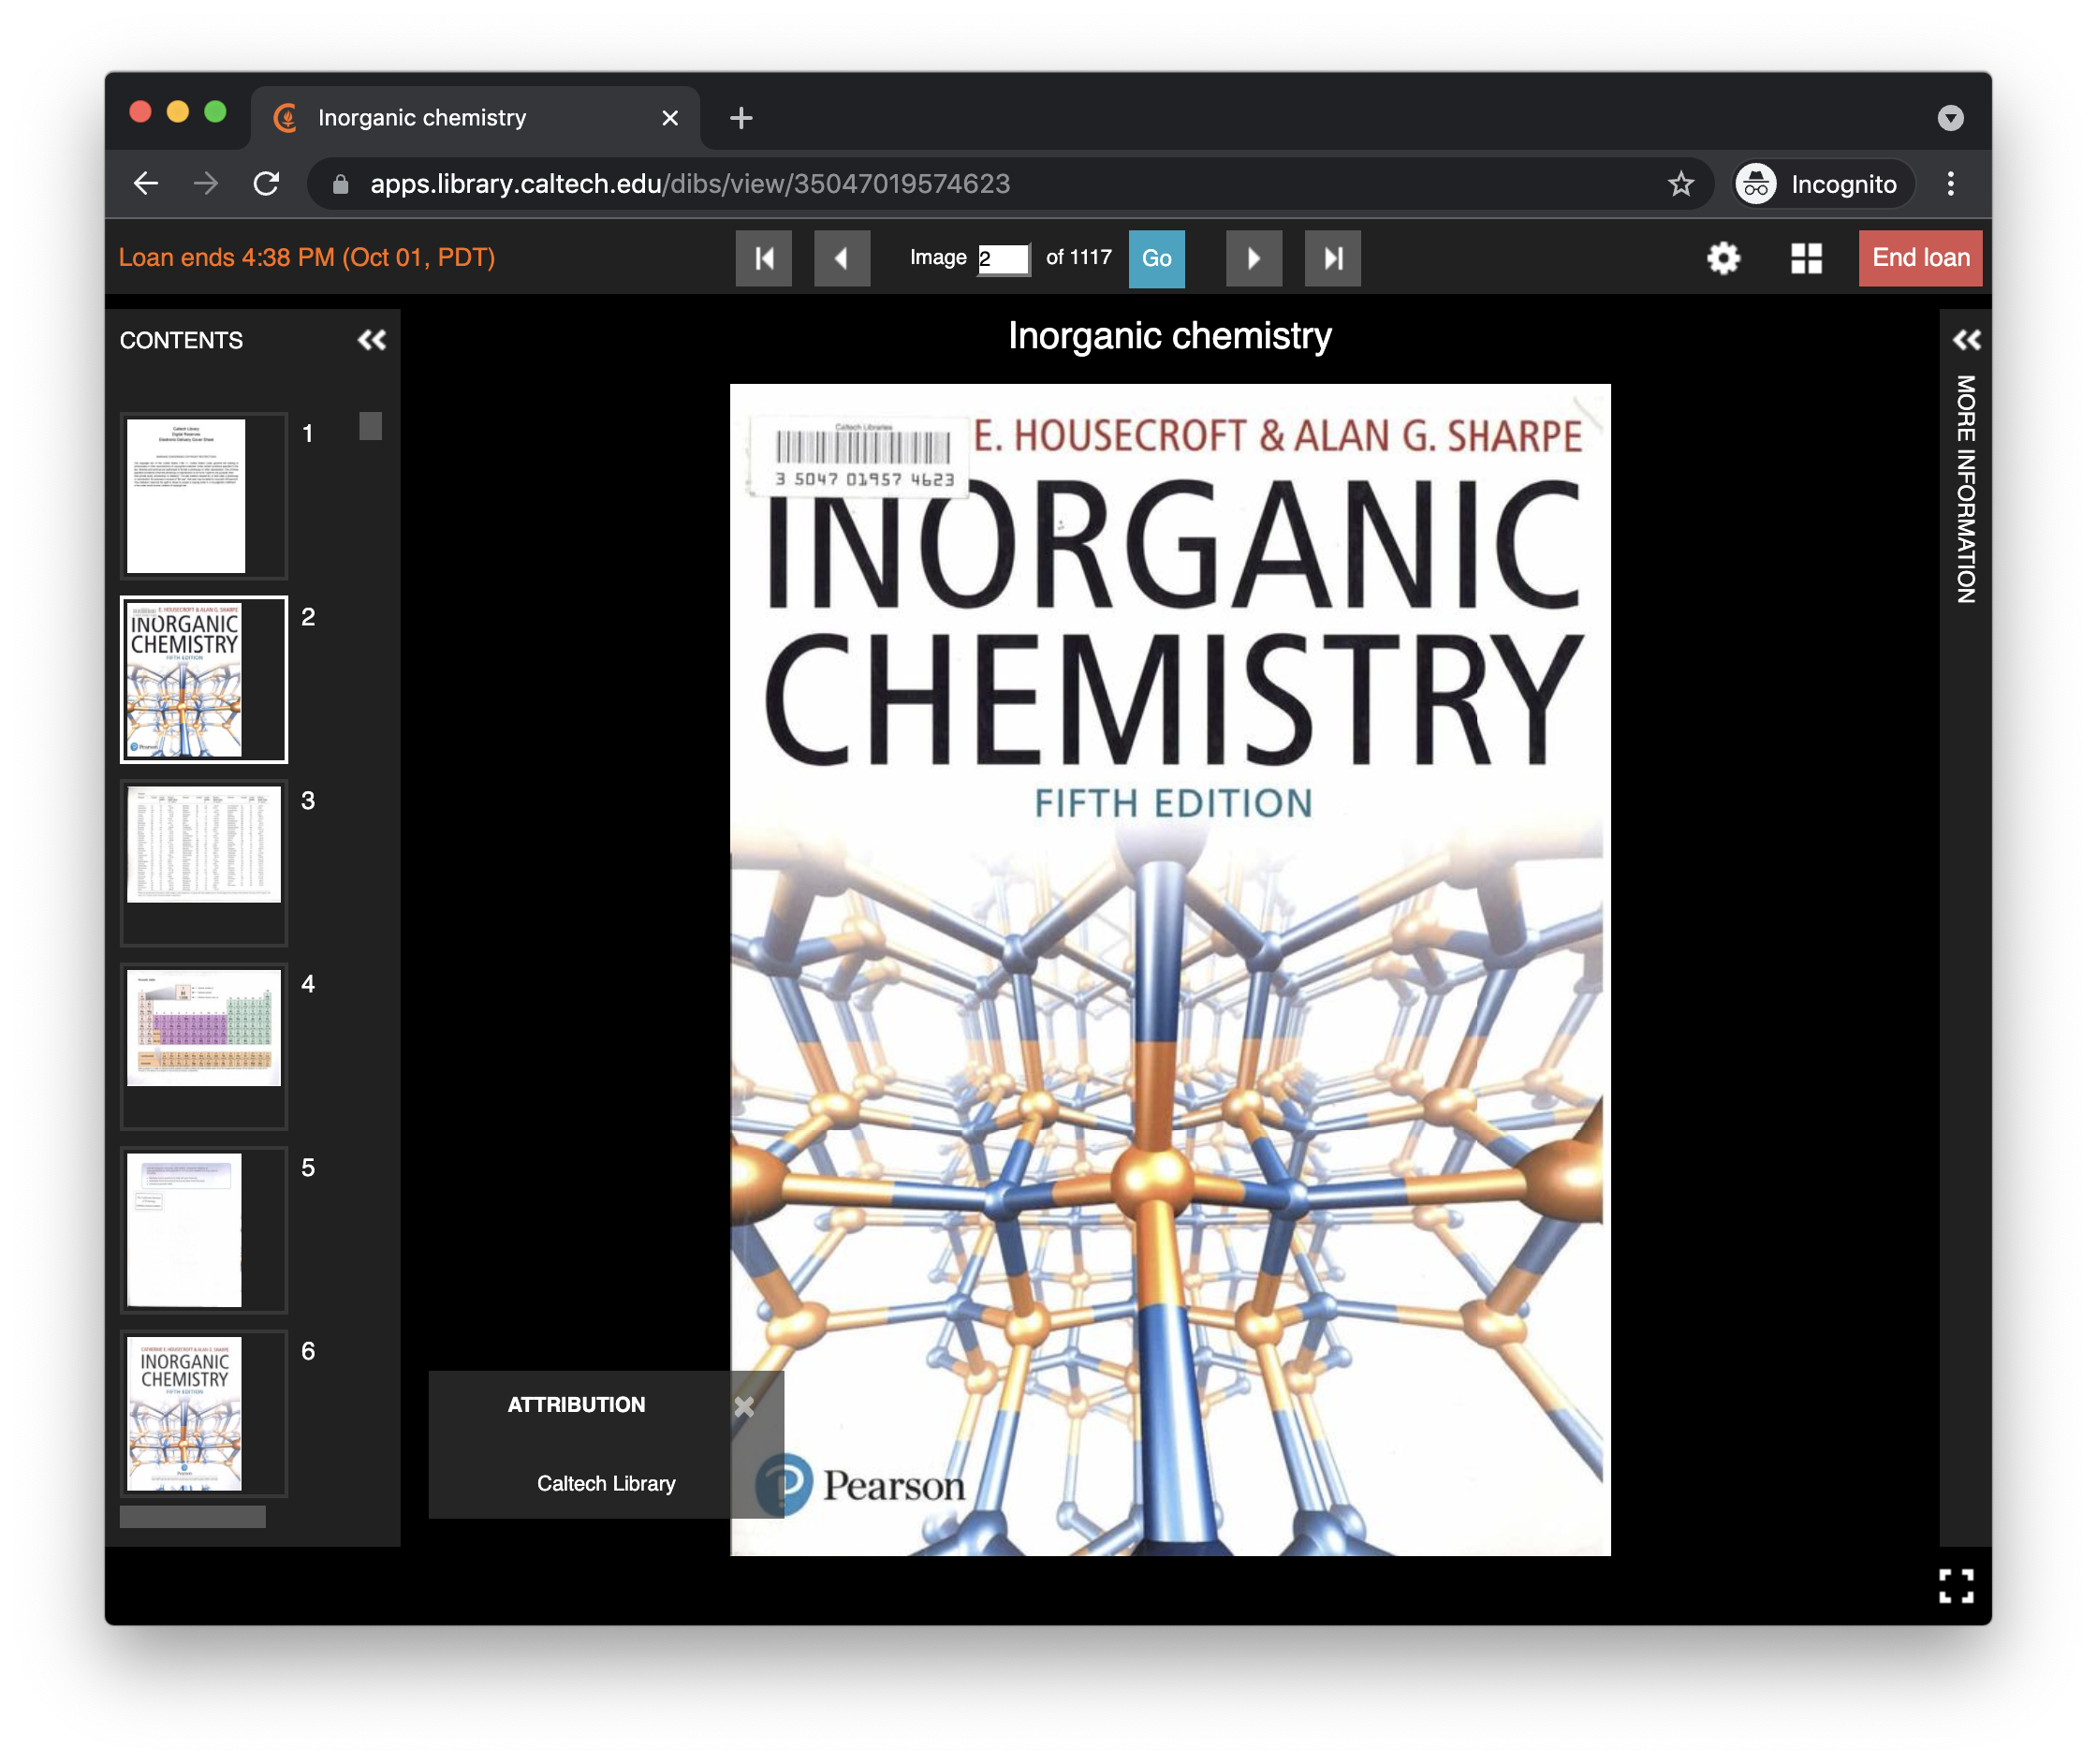
As mentioned above, patrons are assumed to be provided information about individual items available for loan. The working assumption is that they will be given URLs that take them directly to item description pages in DIBS. An example of such an item description page is shown below:
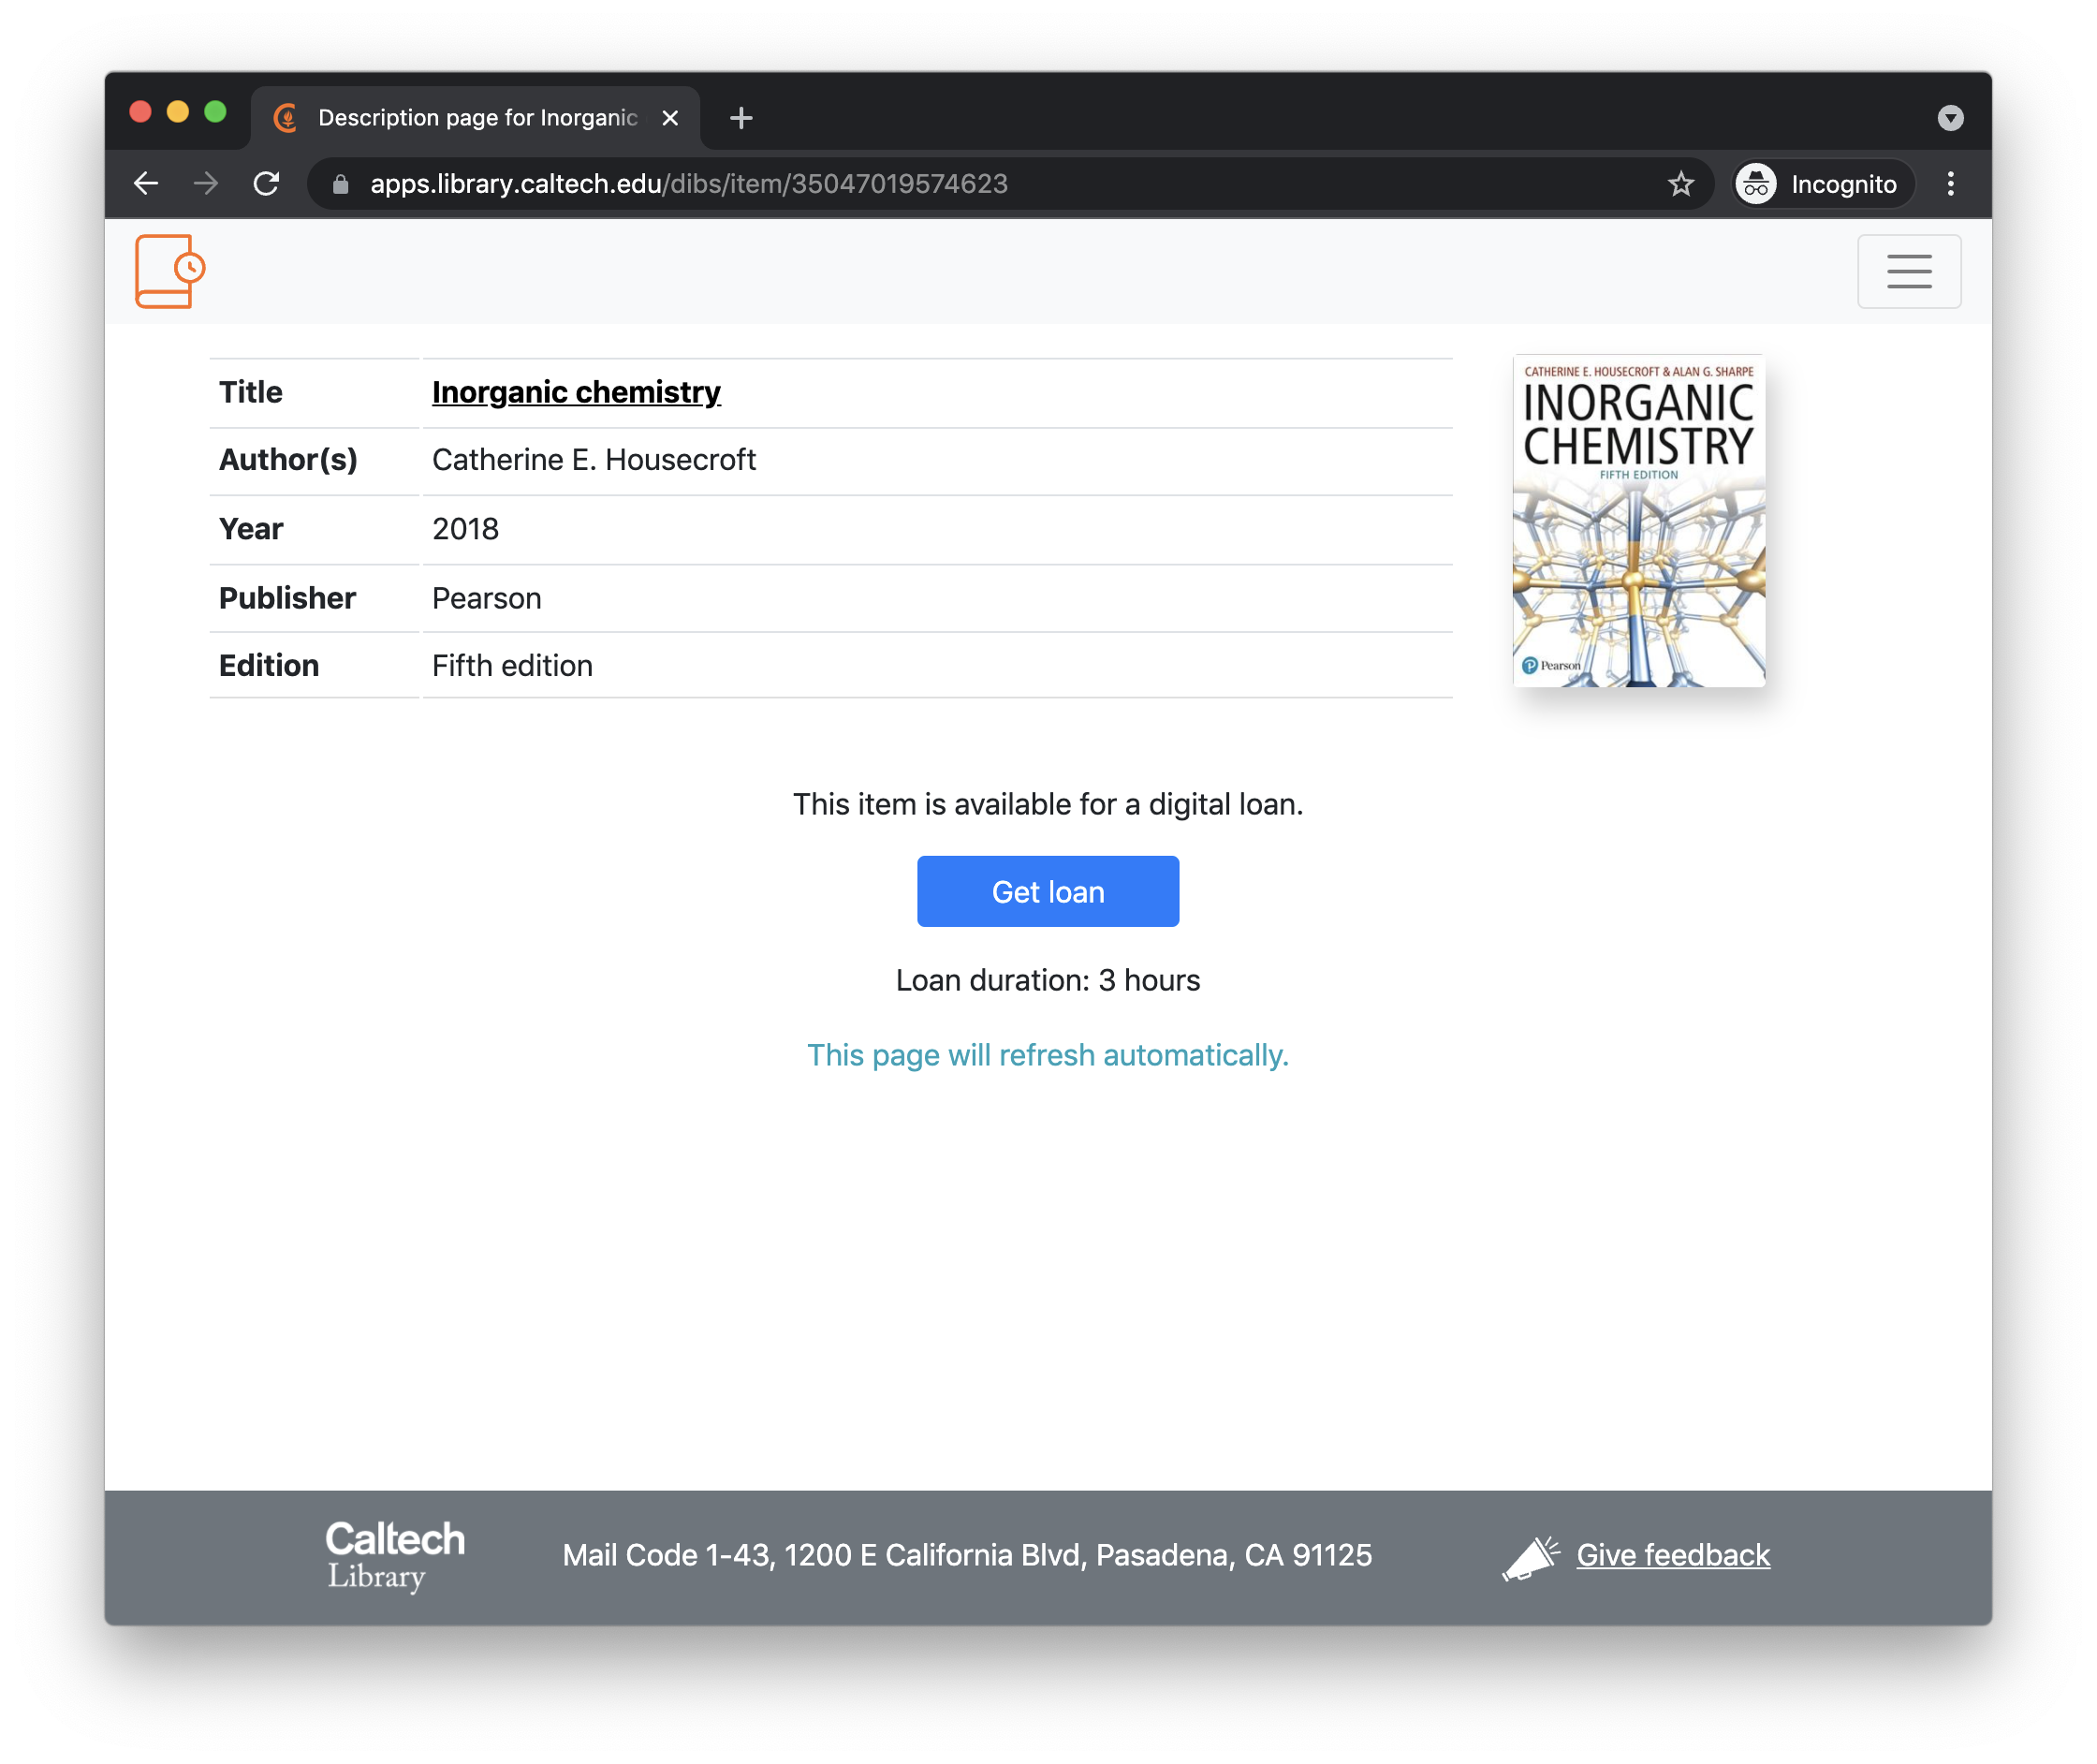
The item description page provides basic information about a particular title available through DIBS, along with a button to request a digital loan. The information about the title is derived from Caltech’s FOLIO server based on the barcode used by Library staff when they add the item to DIBS.
The text and button shown in the lower half of the page change based on the current availability of the item. The page shows a button if the item is available for loan at that time. If the item is not available to the patron, the button changes to , and in addition, the text above the button provides information about why it is not available and when it will be available again:

If the item is available to the user, and they click the button, then they will be presented with a brief confirmation dialog. If they elect to proceed, a loan will be started immediately and they will be transferred to the viewer. The screenshot below gives an example of what a book looks like in this viewer:
DIBS uses the Universal Viewer (UV), an open-source browser-based media viewer that works with content described in IIIF format. The loan is issued for a limited time, and the end time is shown in the upper left portion of the viewer screen. (The information about the loan duration and the URL for the viewer page are also sent separately via email to the patron, in case they lose it or want to view the content from a different device.)
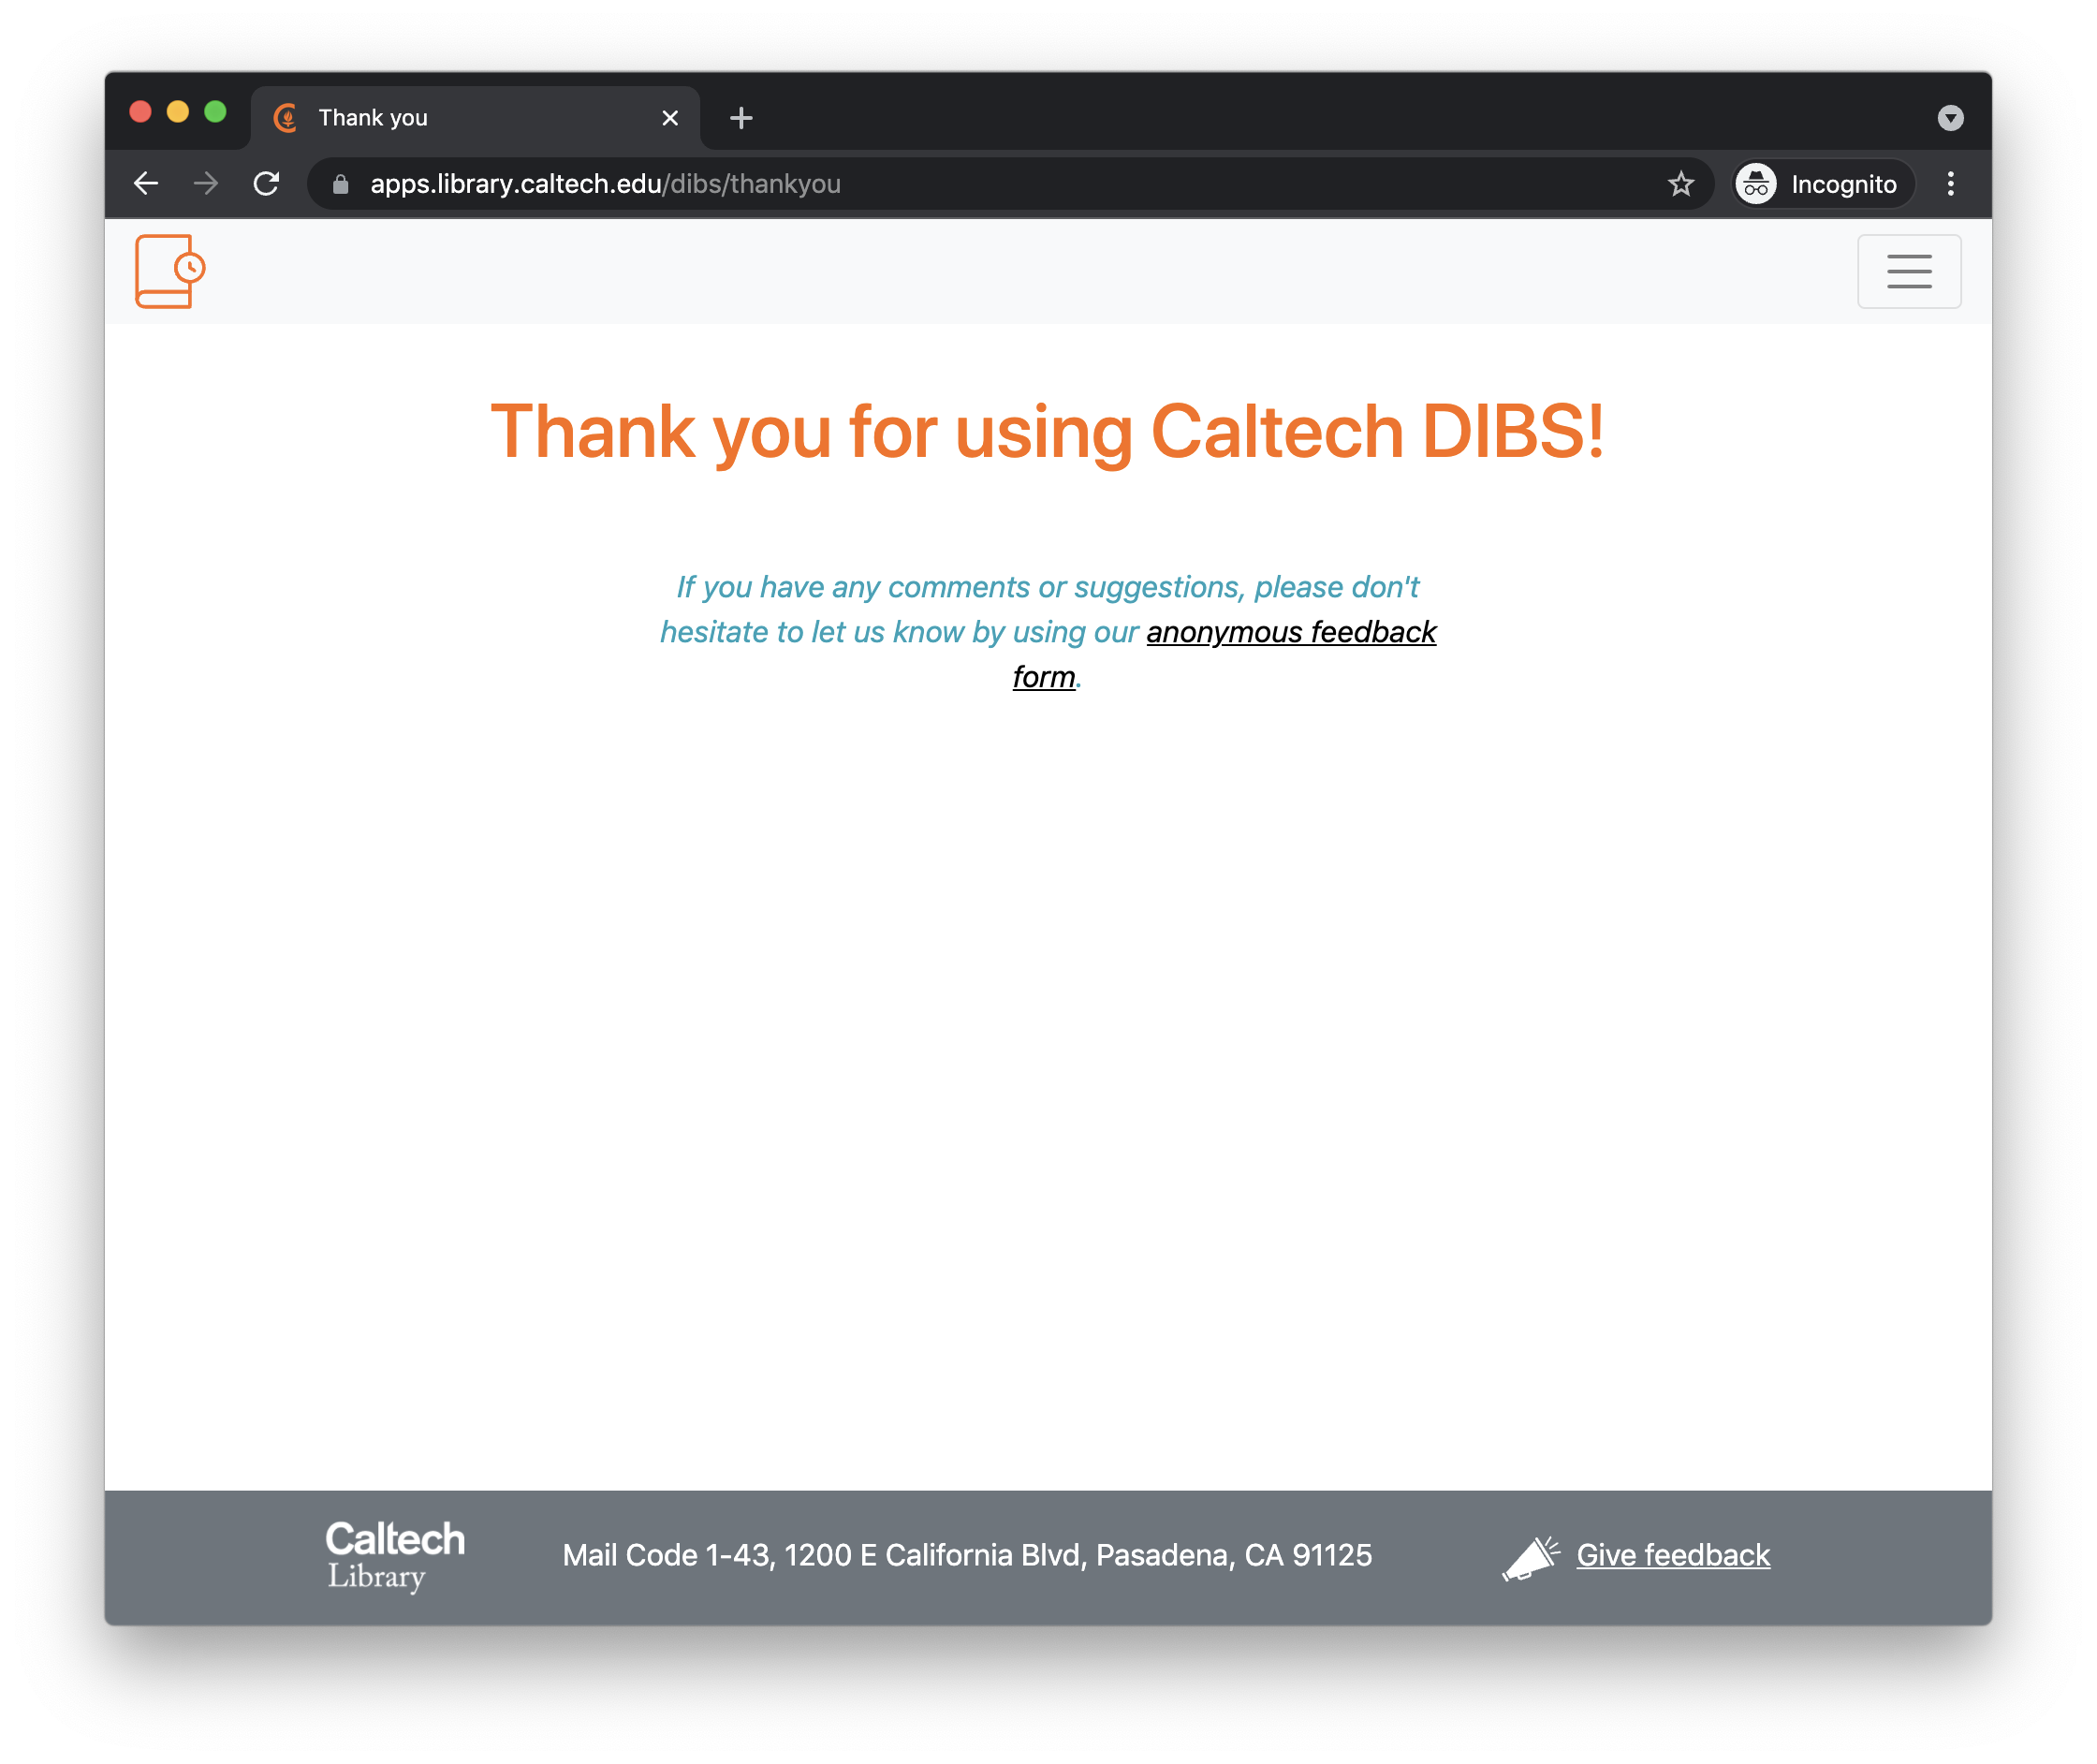
The patron can elect to end the loan early. If they do, the viewer will close and they will be presented with a thank-you page that also includes a link to a feedback page:
In designing DIBS, we sought to minimize the amount of patron data requested and stored, to maintain patron privacy and reduce the impact of potential data leaks. DIBS does not store any patron information when a loan is not in effect (after the lock-out period on a title that was just borrowed), and during a loan, it stores only the user’s institutional single sign-on (SSO) identity combined with the (single) title they have on loan during the loan period. There are no provisions in the software for retaining the information past the loan period, or tracking identities or loan statistics based on users.
The staff experience
Overall, the workflow to add new items to DIBS is simple: staff scan books and store the results in a secure location (one with a shared file system accessible to the DIBS server) and add basic metadata to the DIBS database. Once the item is added to DIBS and flagged as ready to be loaned, a web page for the item allows institutional patrons to request time-limited loans and view the items in the Universal Viewer. (That is the patron experience described in the previous section.)
How users are identified as staff users
As mentioned above, users are authenticated by a separate software layer before they can access DIBS. This simplifies DIBS’s implementation and reduces what it must do to distinguish different user roles. By default, every authenticated user is assumed to have non-staff privileges, so all that system administrators need to do is tell DIBS which users should have staff privileges. DIBS comes with a command-line utility program called people-manager for that purpose. (It’s located in the admin subdirectory of the DIBS source repository). For example, to add a user with identity fakeuser2021@caltech.edu as a staff user, a system administrator needs to run the following command on the server where DIBS is installed:
admin/people-manager add uname="fakeuser2021@caltech.edu" role="library"
Additional pages available to staff users
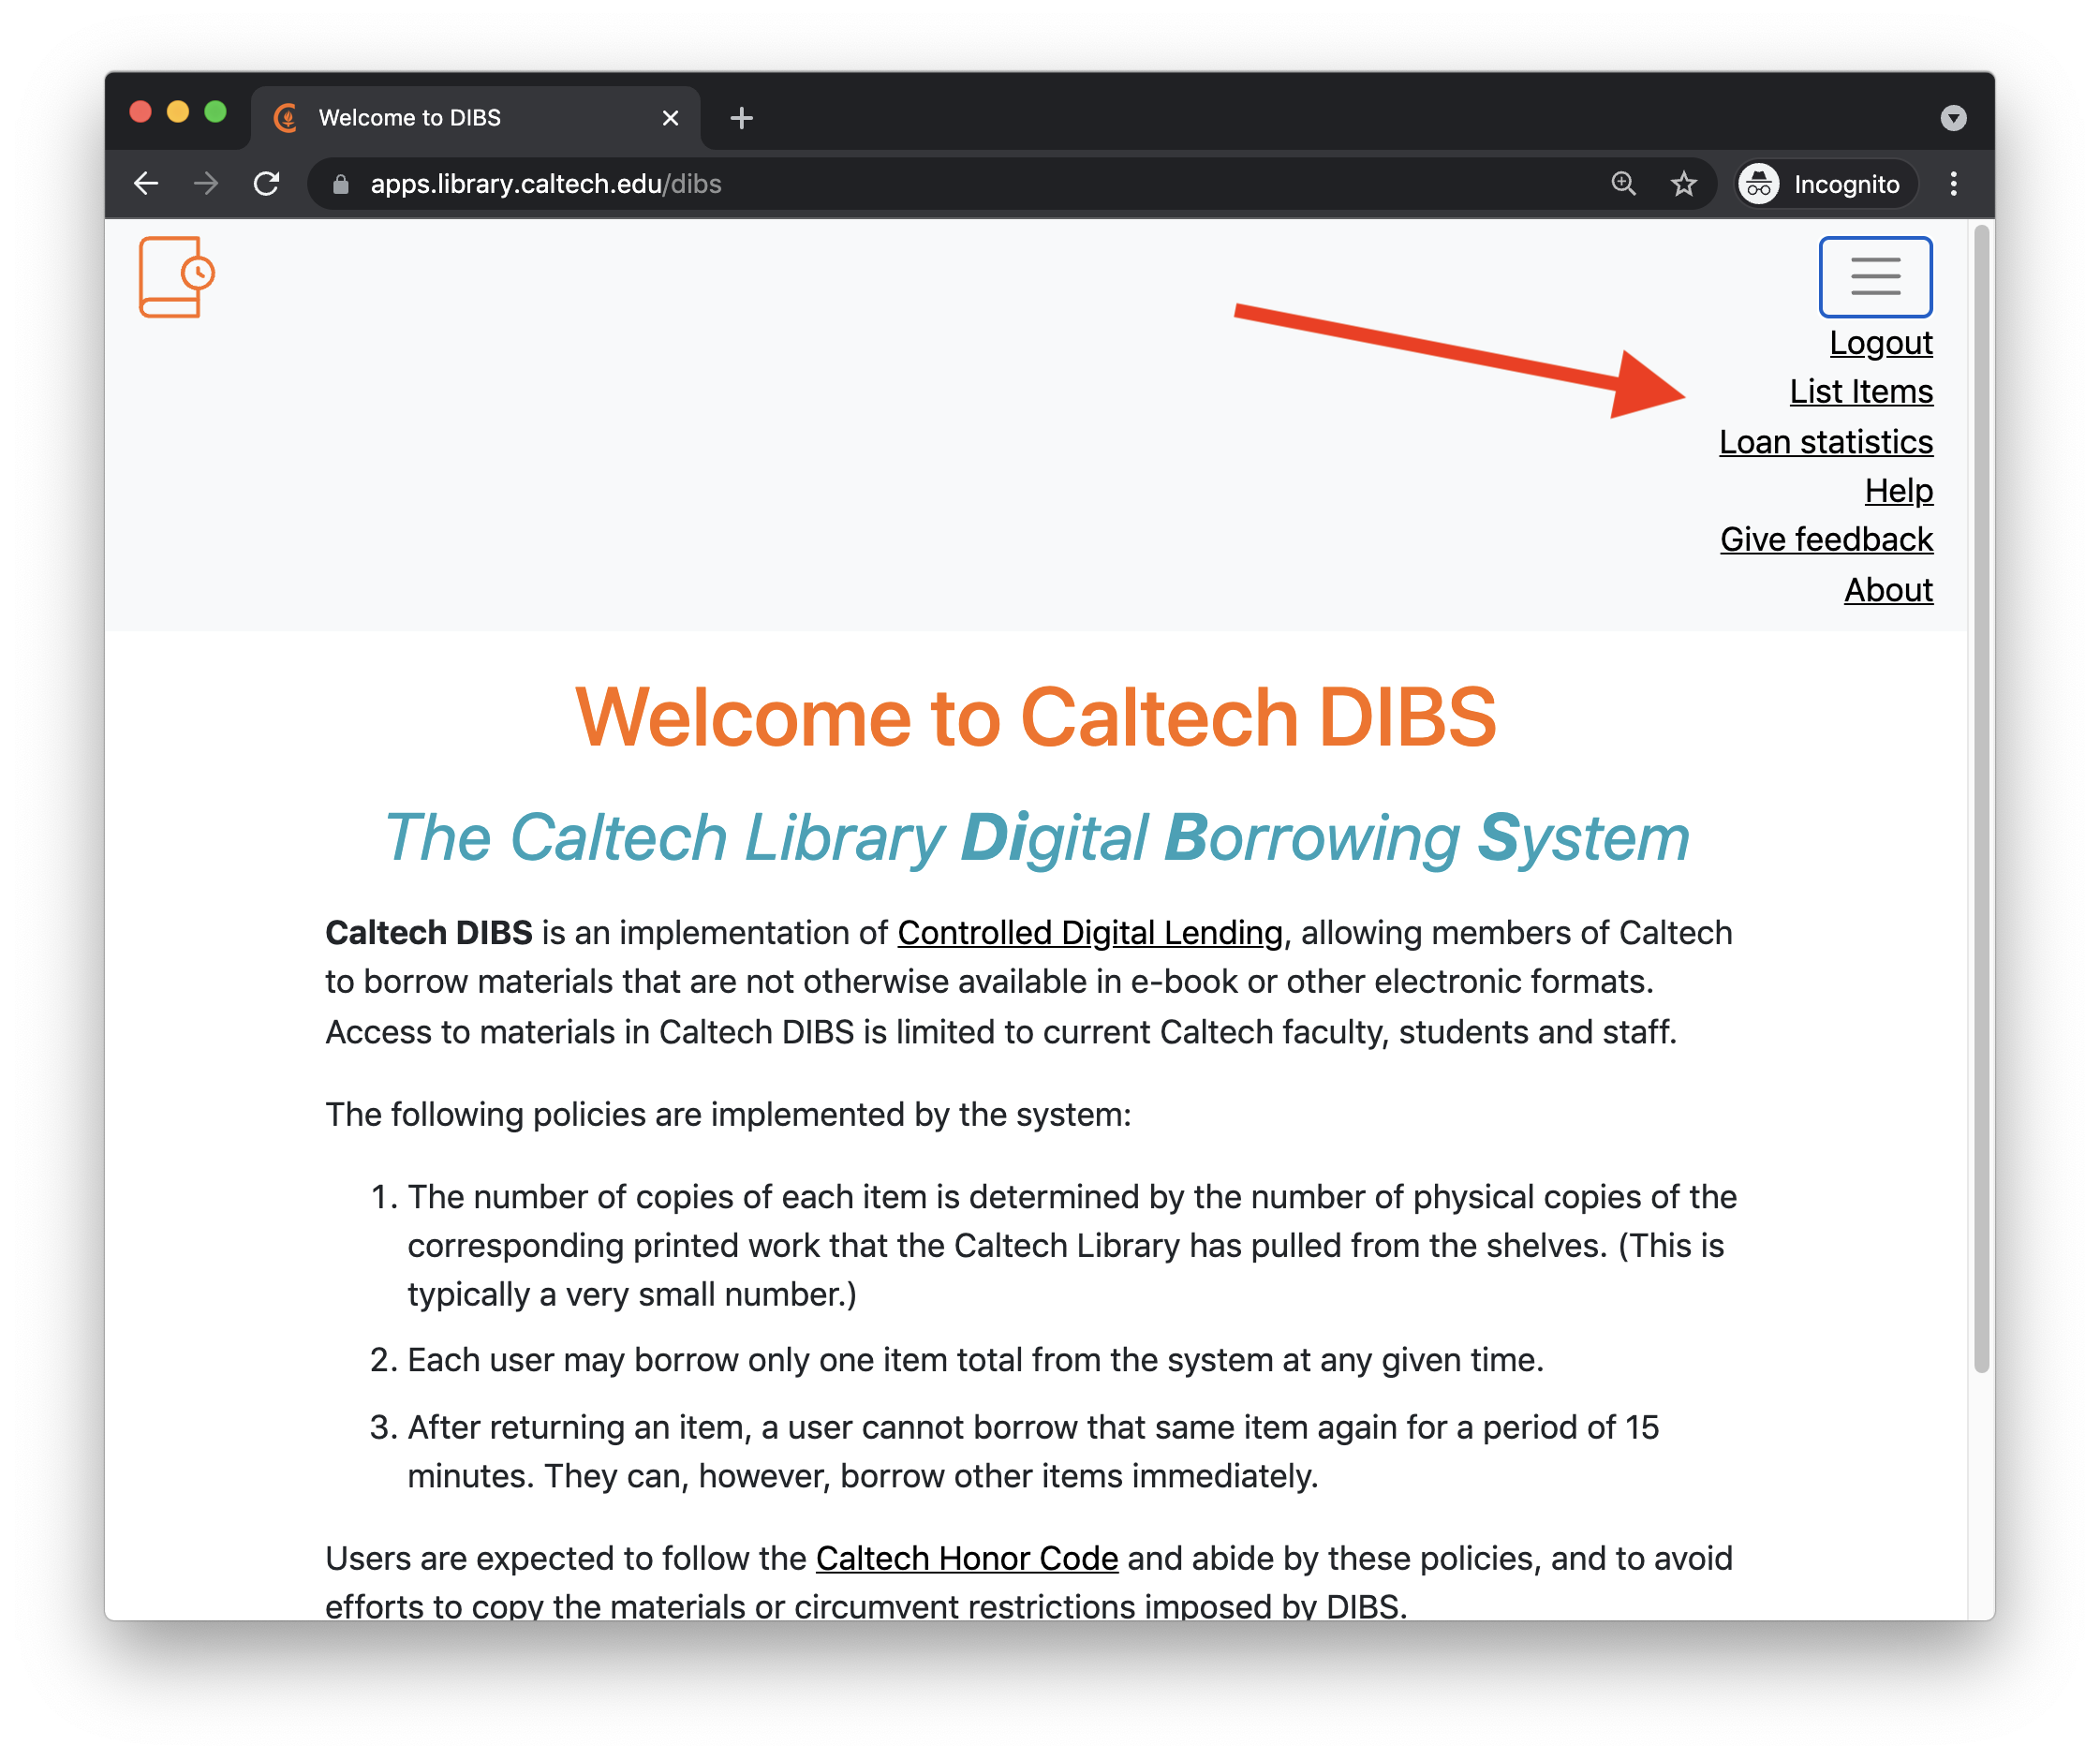
Users with staff privileges see additional links in the upper-right hand corner menu on every page presented by DIBS. In particular, the menu provides access to the content list and statistics pages, as shown in the screenshot below:
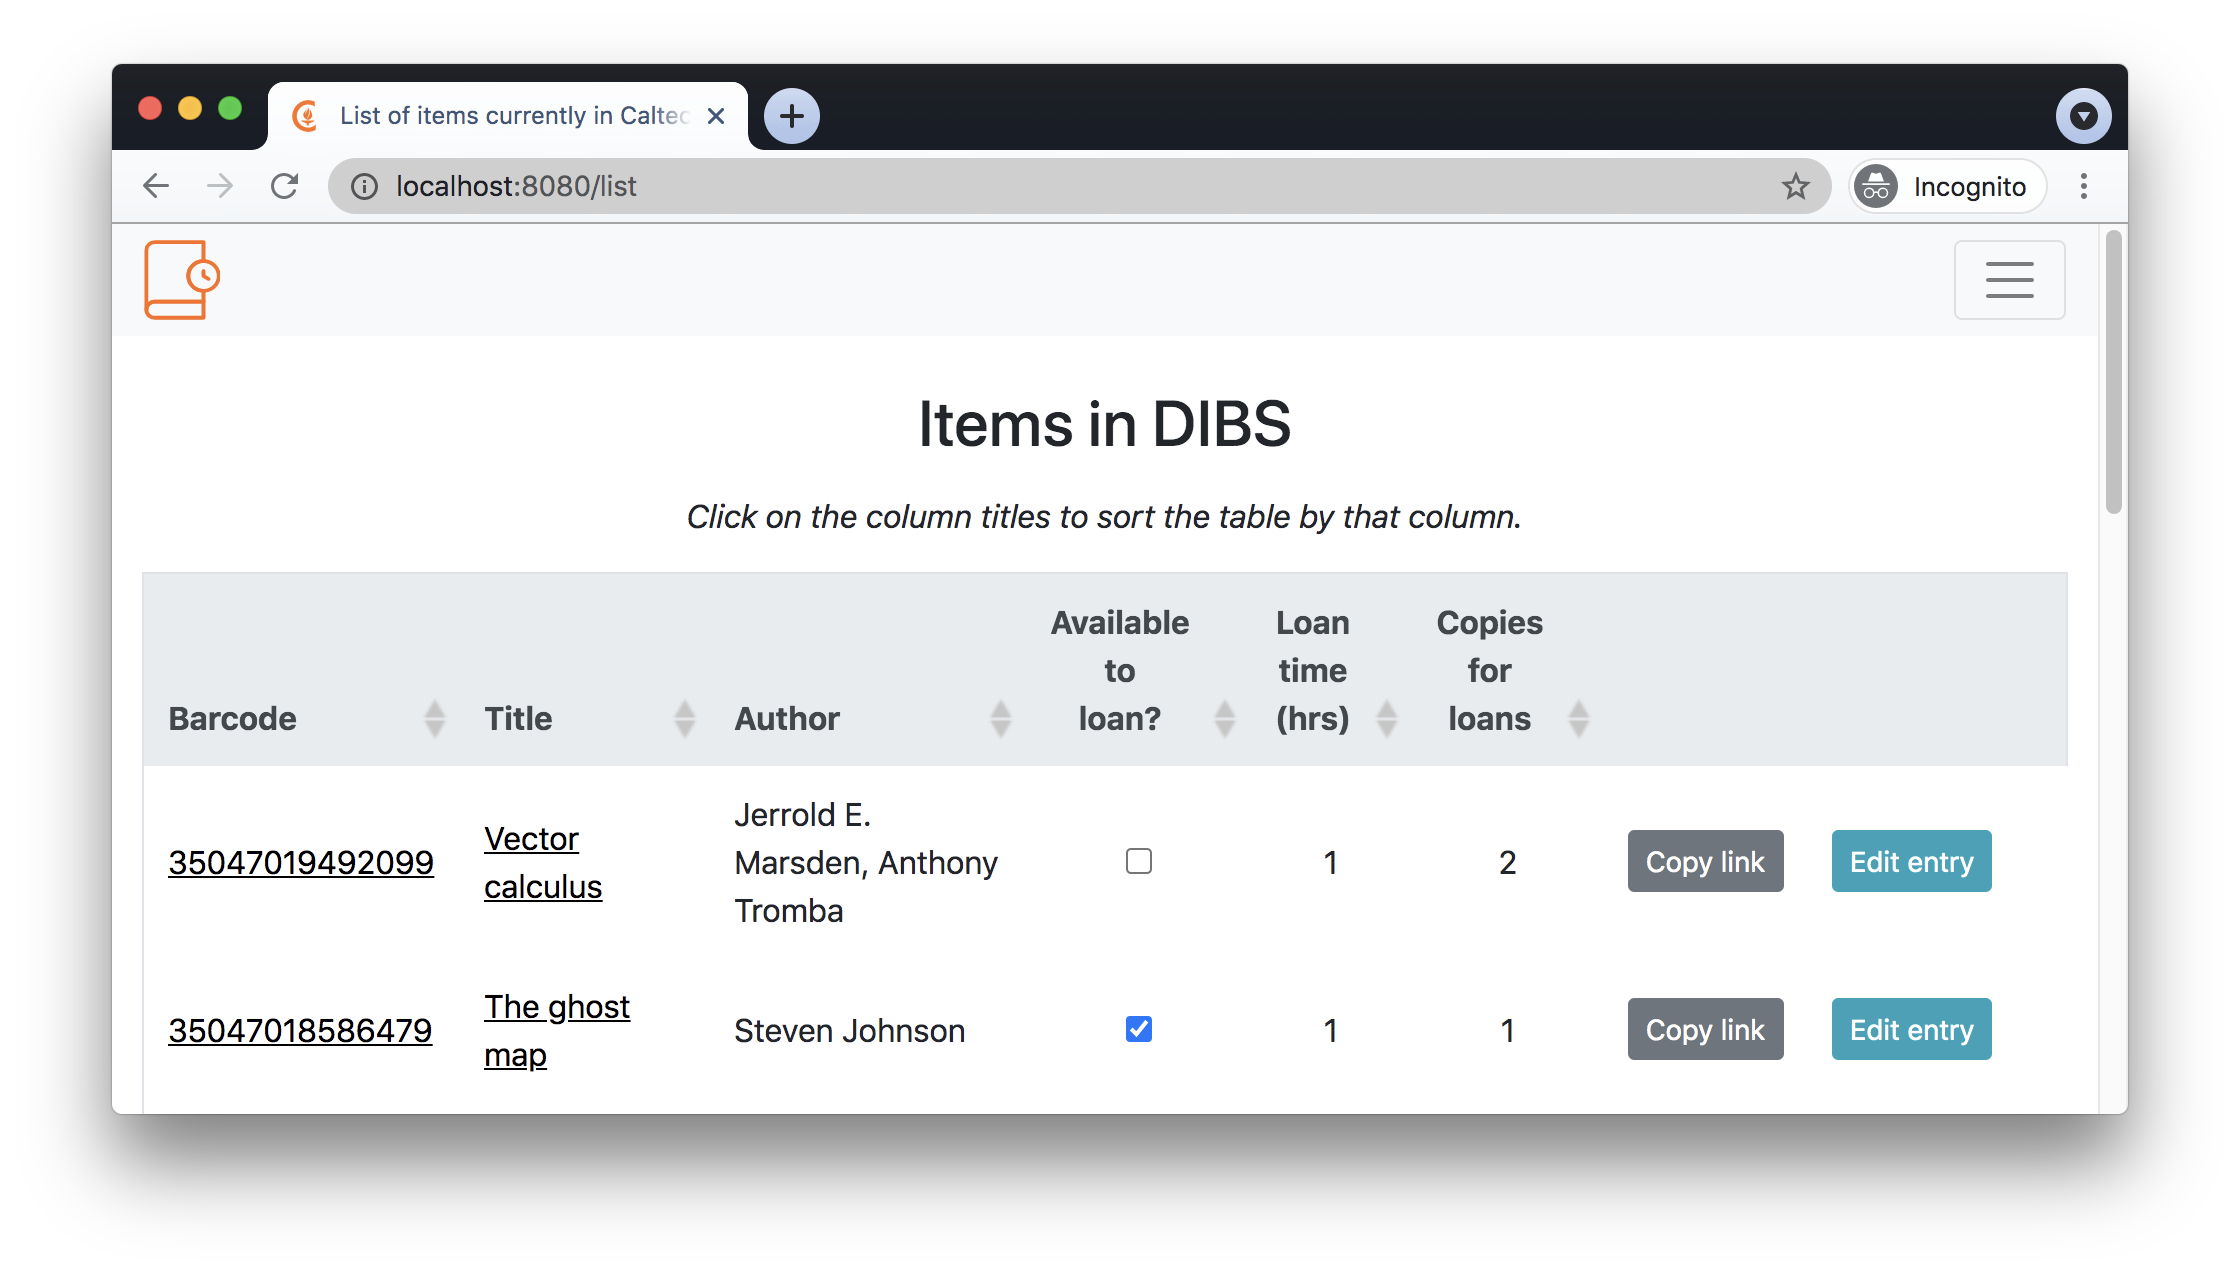
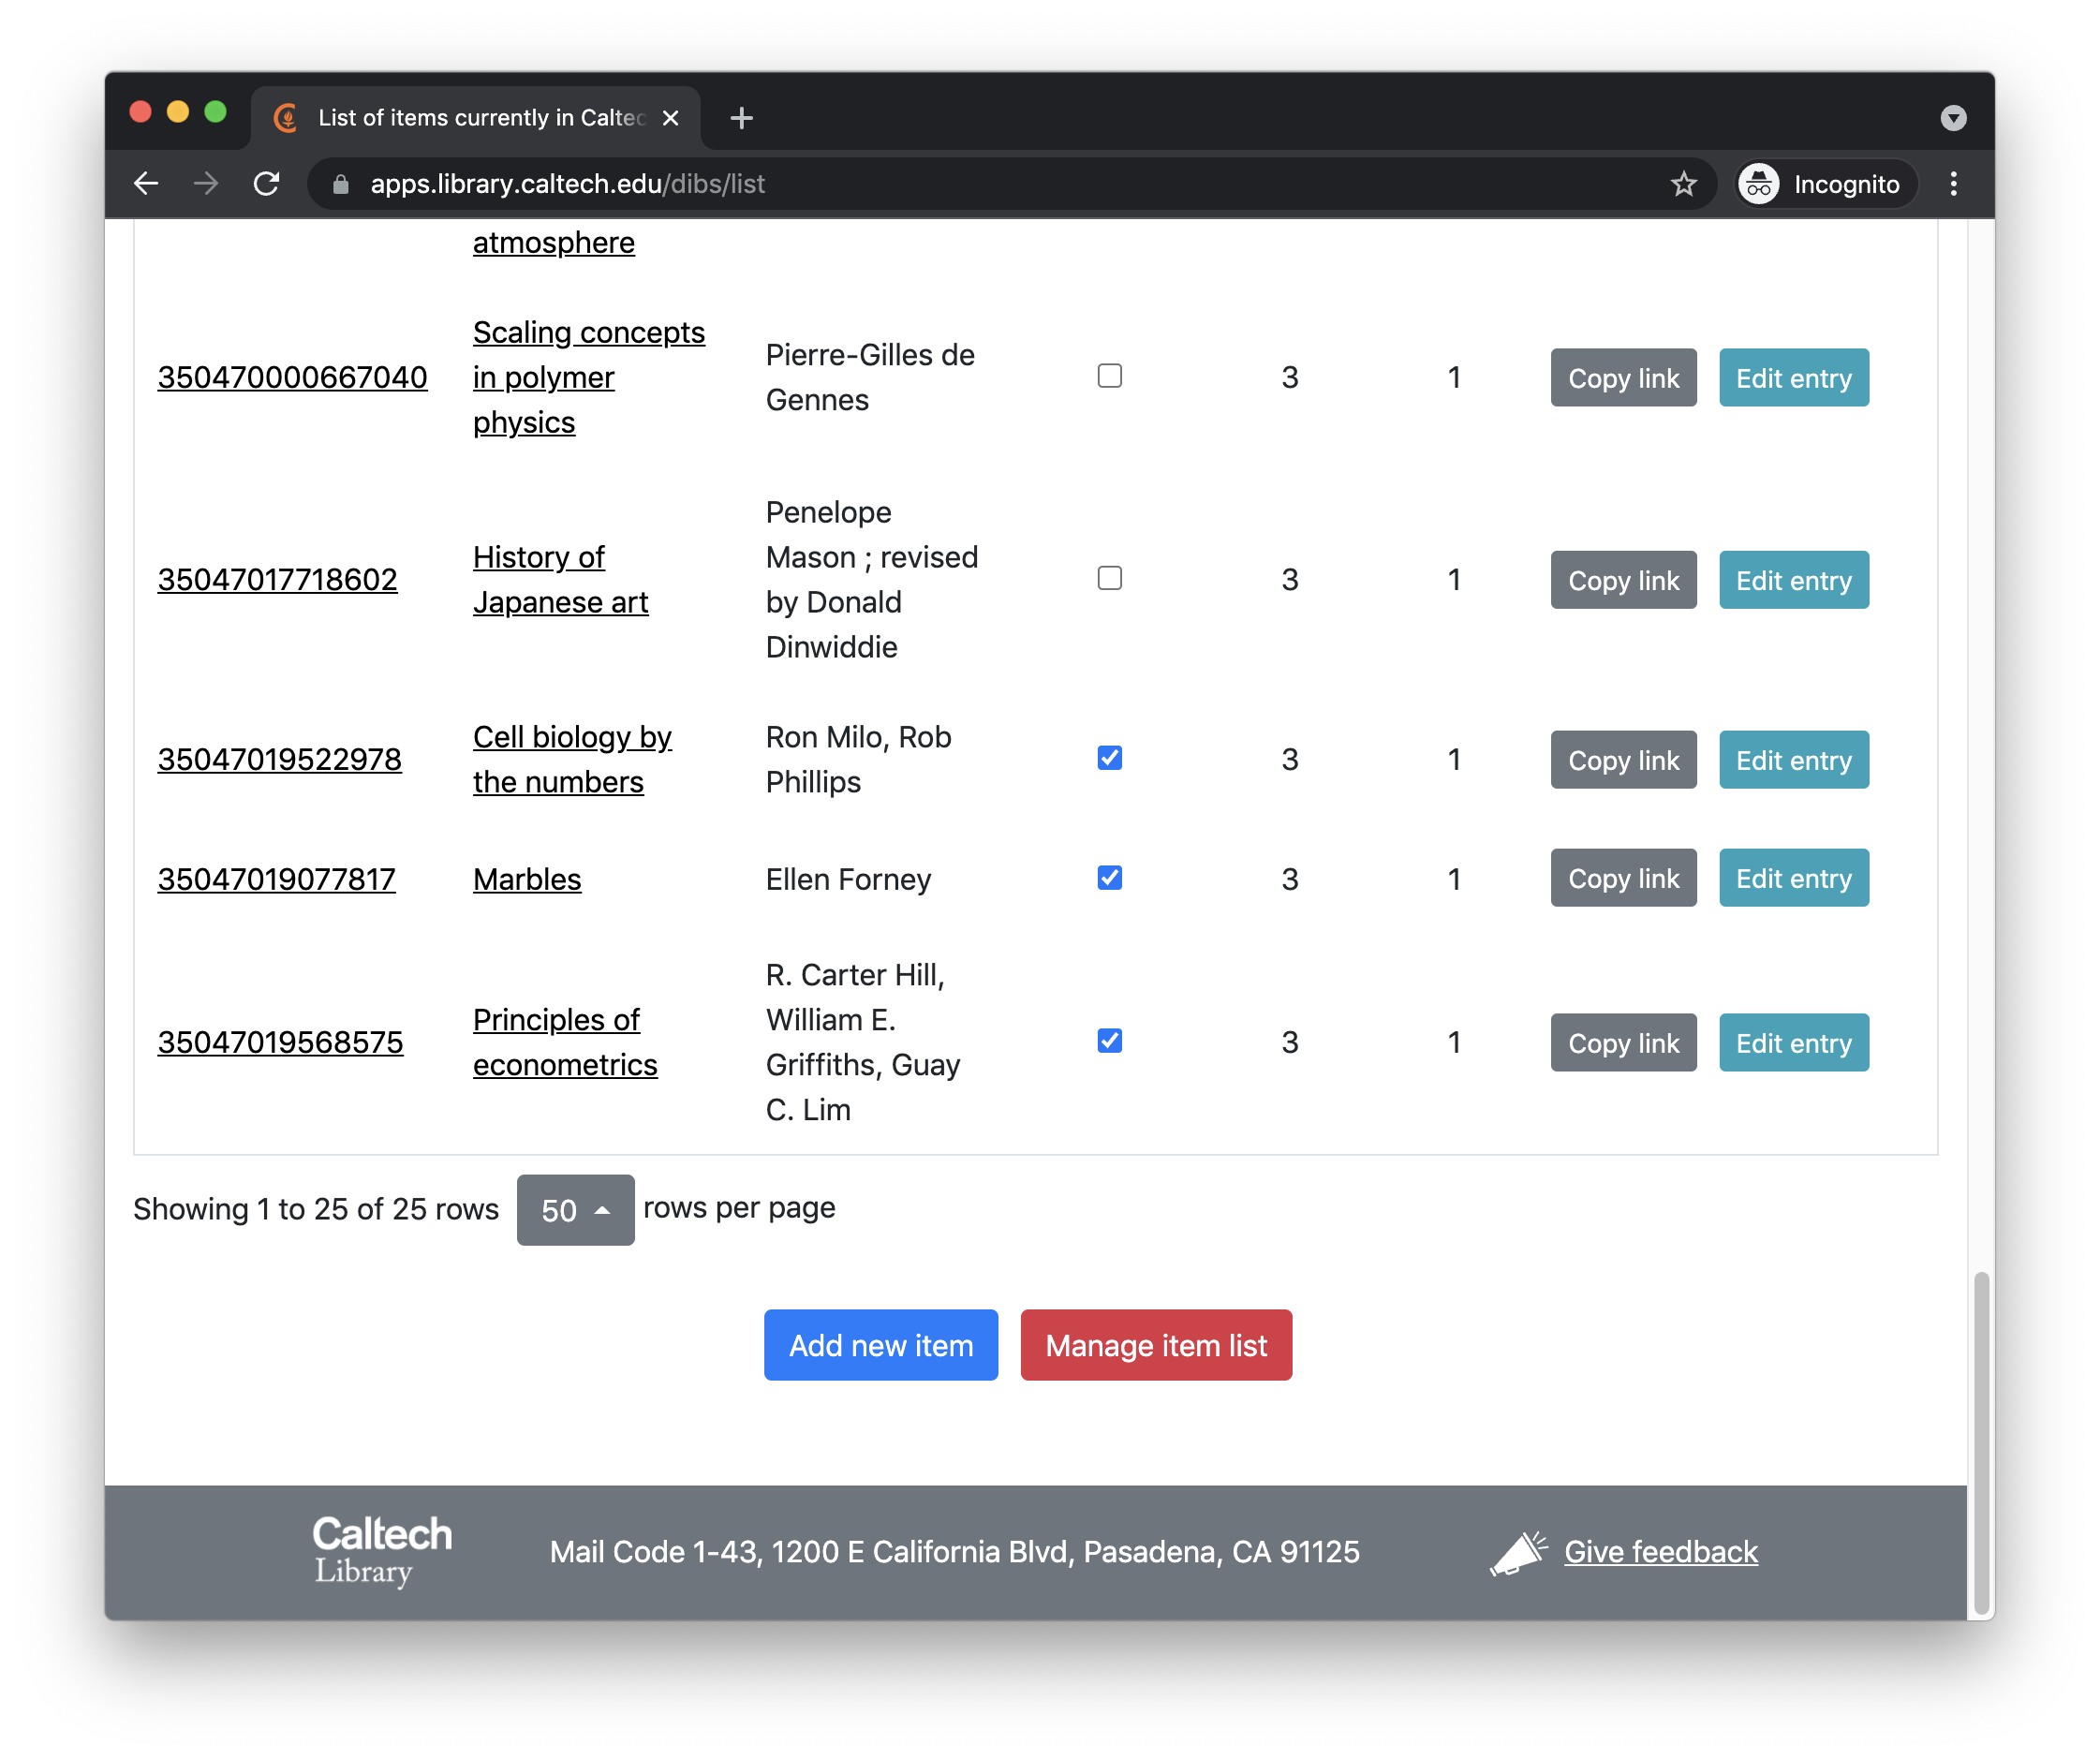
Listing all items in DIBS
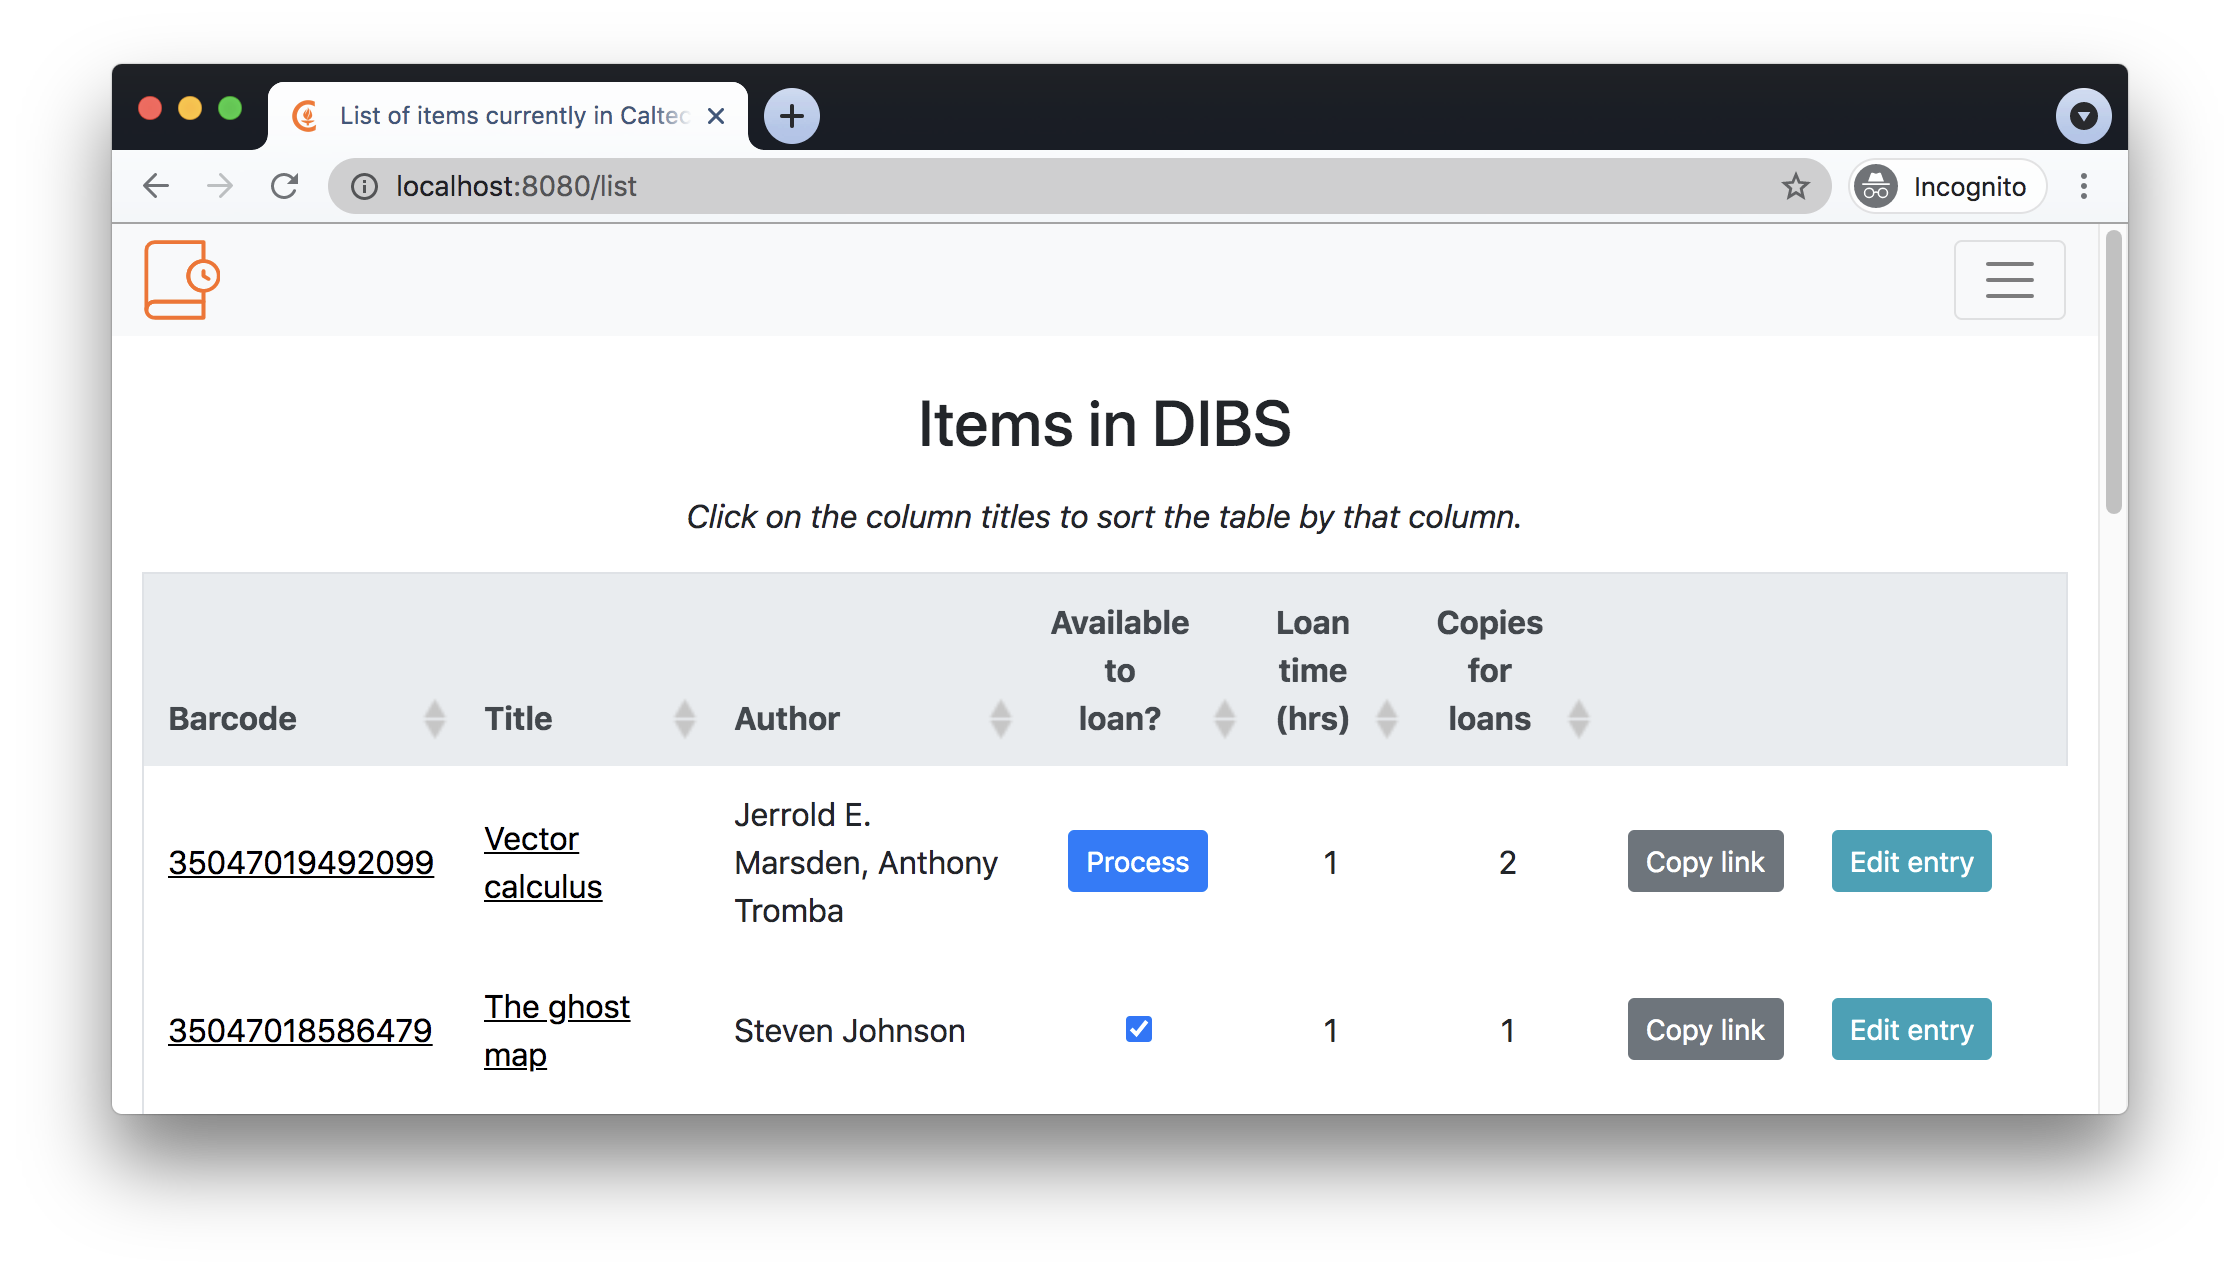
Staff are redirected to the main entry point for staff, which is the list page located at /list:
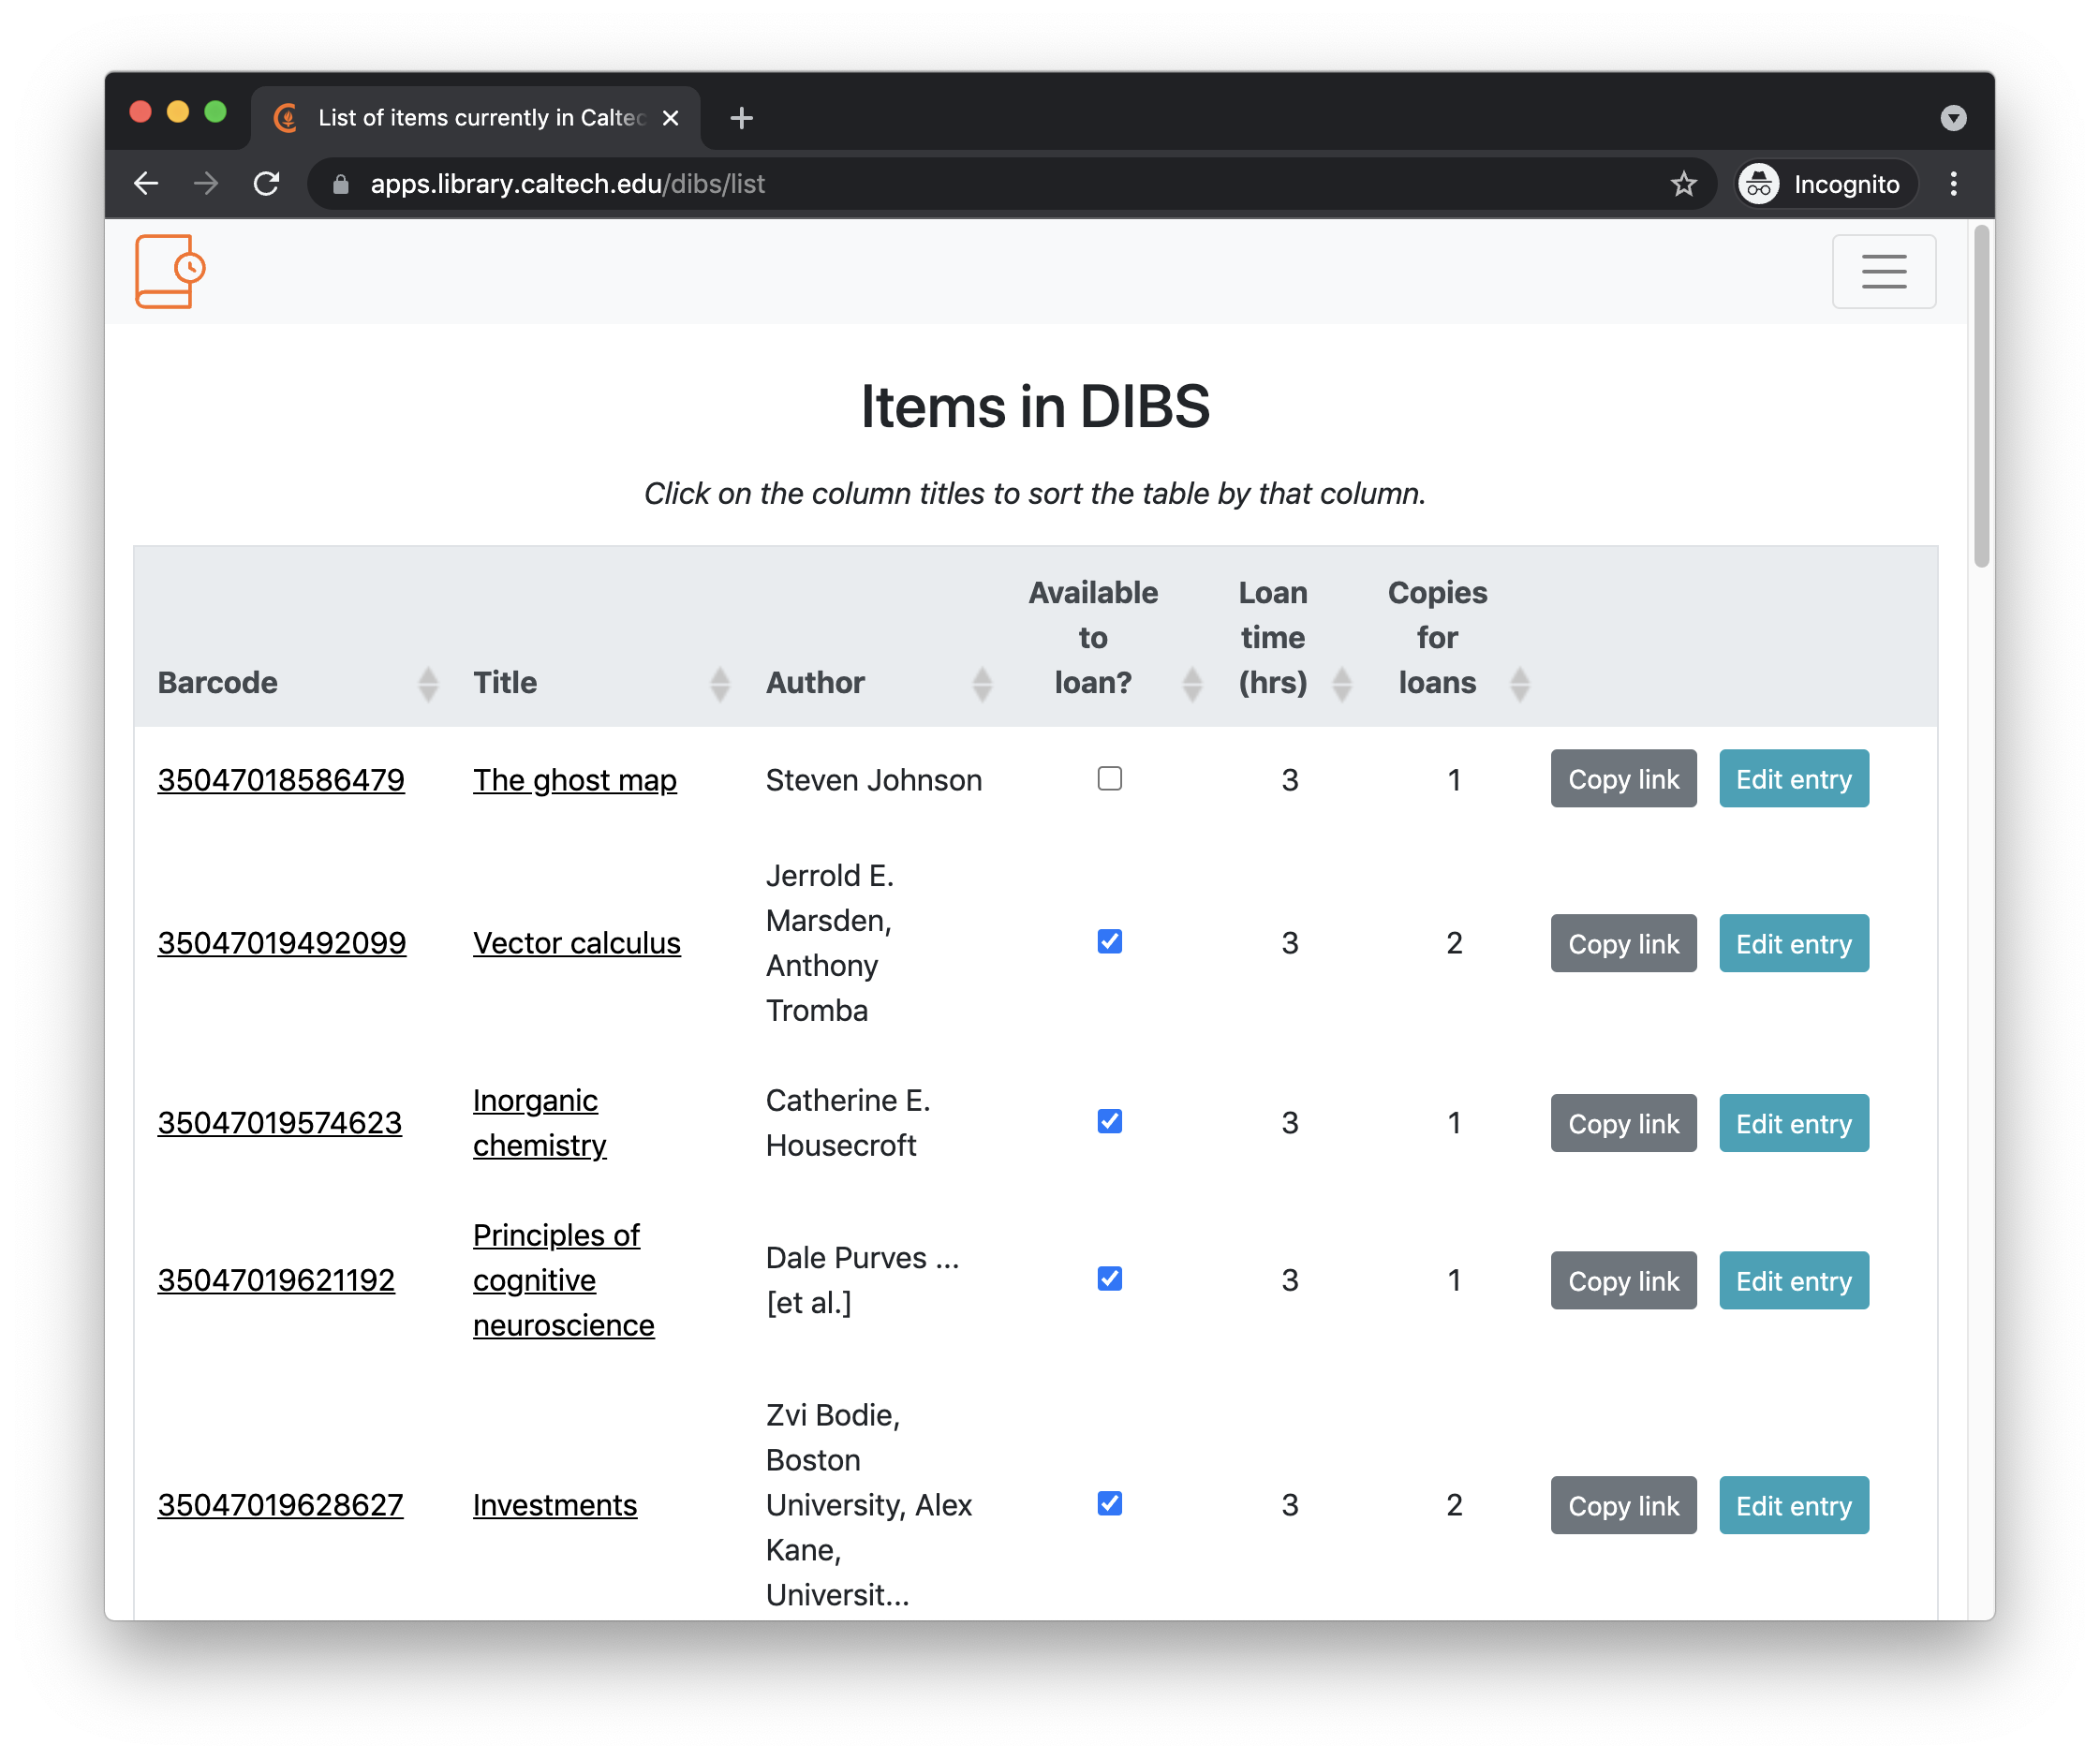
As its name implies, the list page provides a list all of the items known to DIBS (whether they are ready to be available for digital loans or not), and allows staff to add, edit, or remove items. It is also the place where staff can get the link to be distributed to patrons to request loans. In more detail:
Barcode: the barcode identifying the item in the Caltech Library.
Title: the title of the item. This is obtained automatically from the LSP (in Caltech’s case, FOLIO) based on the item’s barcode.
Author: the author of the item. This is obtained automatically from the LSP (in Caltech’s case, FOLIO) based on the item’s barcode.
Available to loan?: when unchecked, the item is not made available for digital loans. The presence of a checkbox in this column depends on the state of processing of the document in the scanning workflow; see the section on The scanning workflow below.
Loan duration: the duration of a loan, in hours.
Copies for loans: how many copies of the item are being made available for simultaneous borrowing?
: this copies to the user’s clipboard a link to the item loan page. This is what should be communicated to course instructors, so that they can pass on the URLs to their students.
: edit the entry. This brings up the same form as is used to add new entries, but with the values filled in, allowing the user to change the values and save the results.
Adding new items
At the bottom of the list page, there are two buttons named and .
If the user clicks the button, they are presented with the following screen:
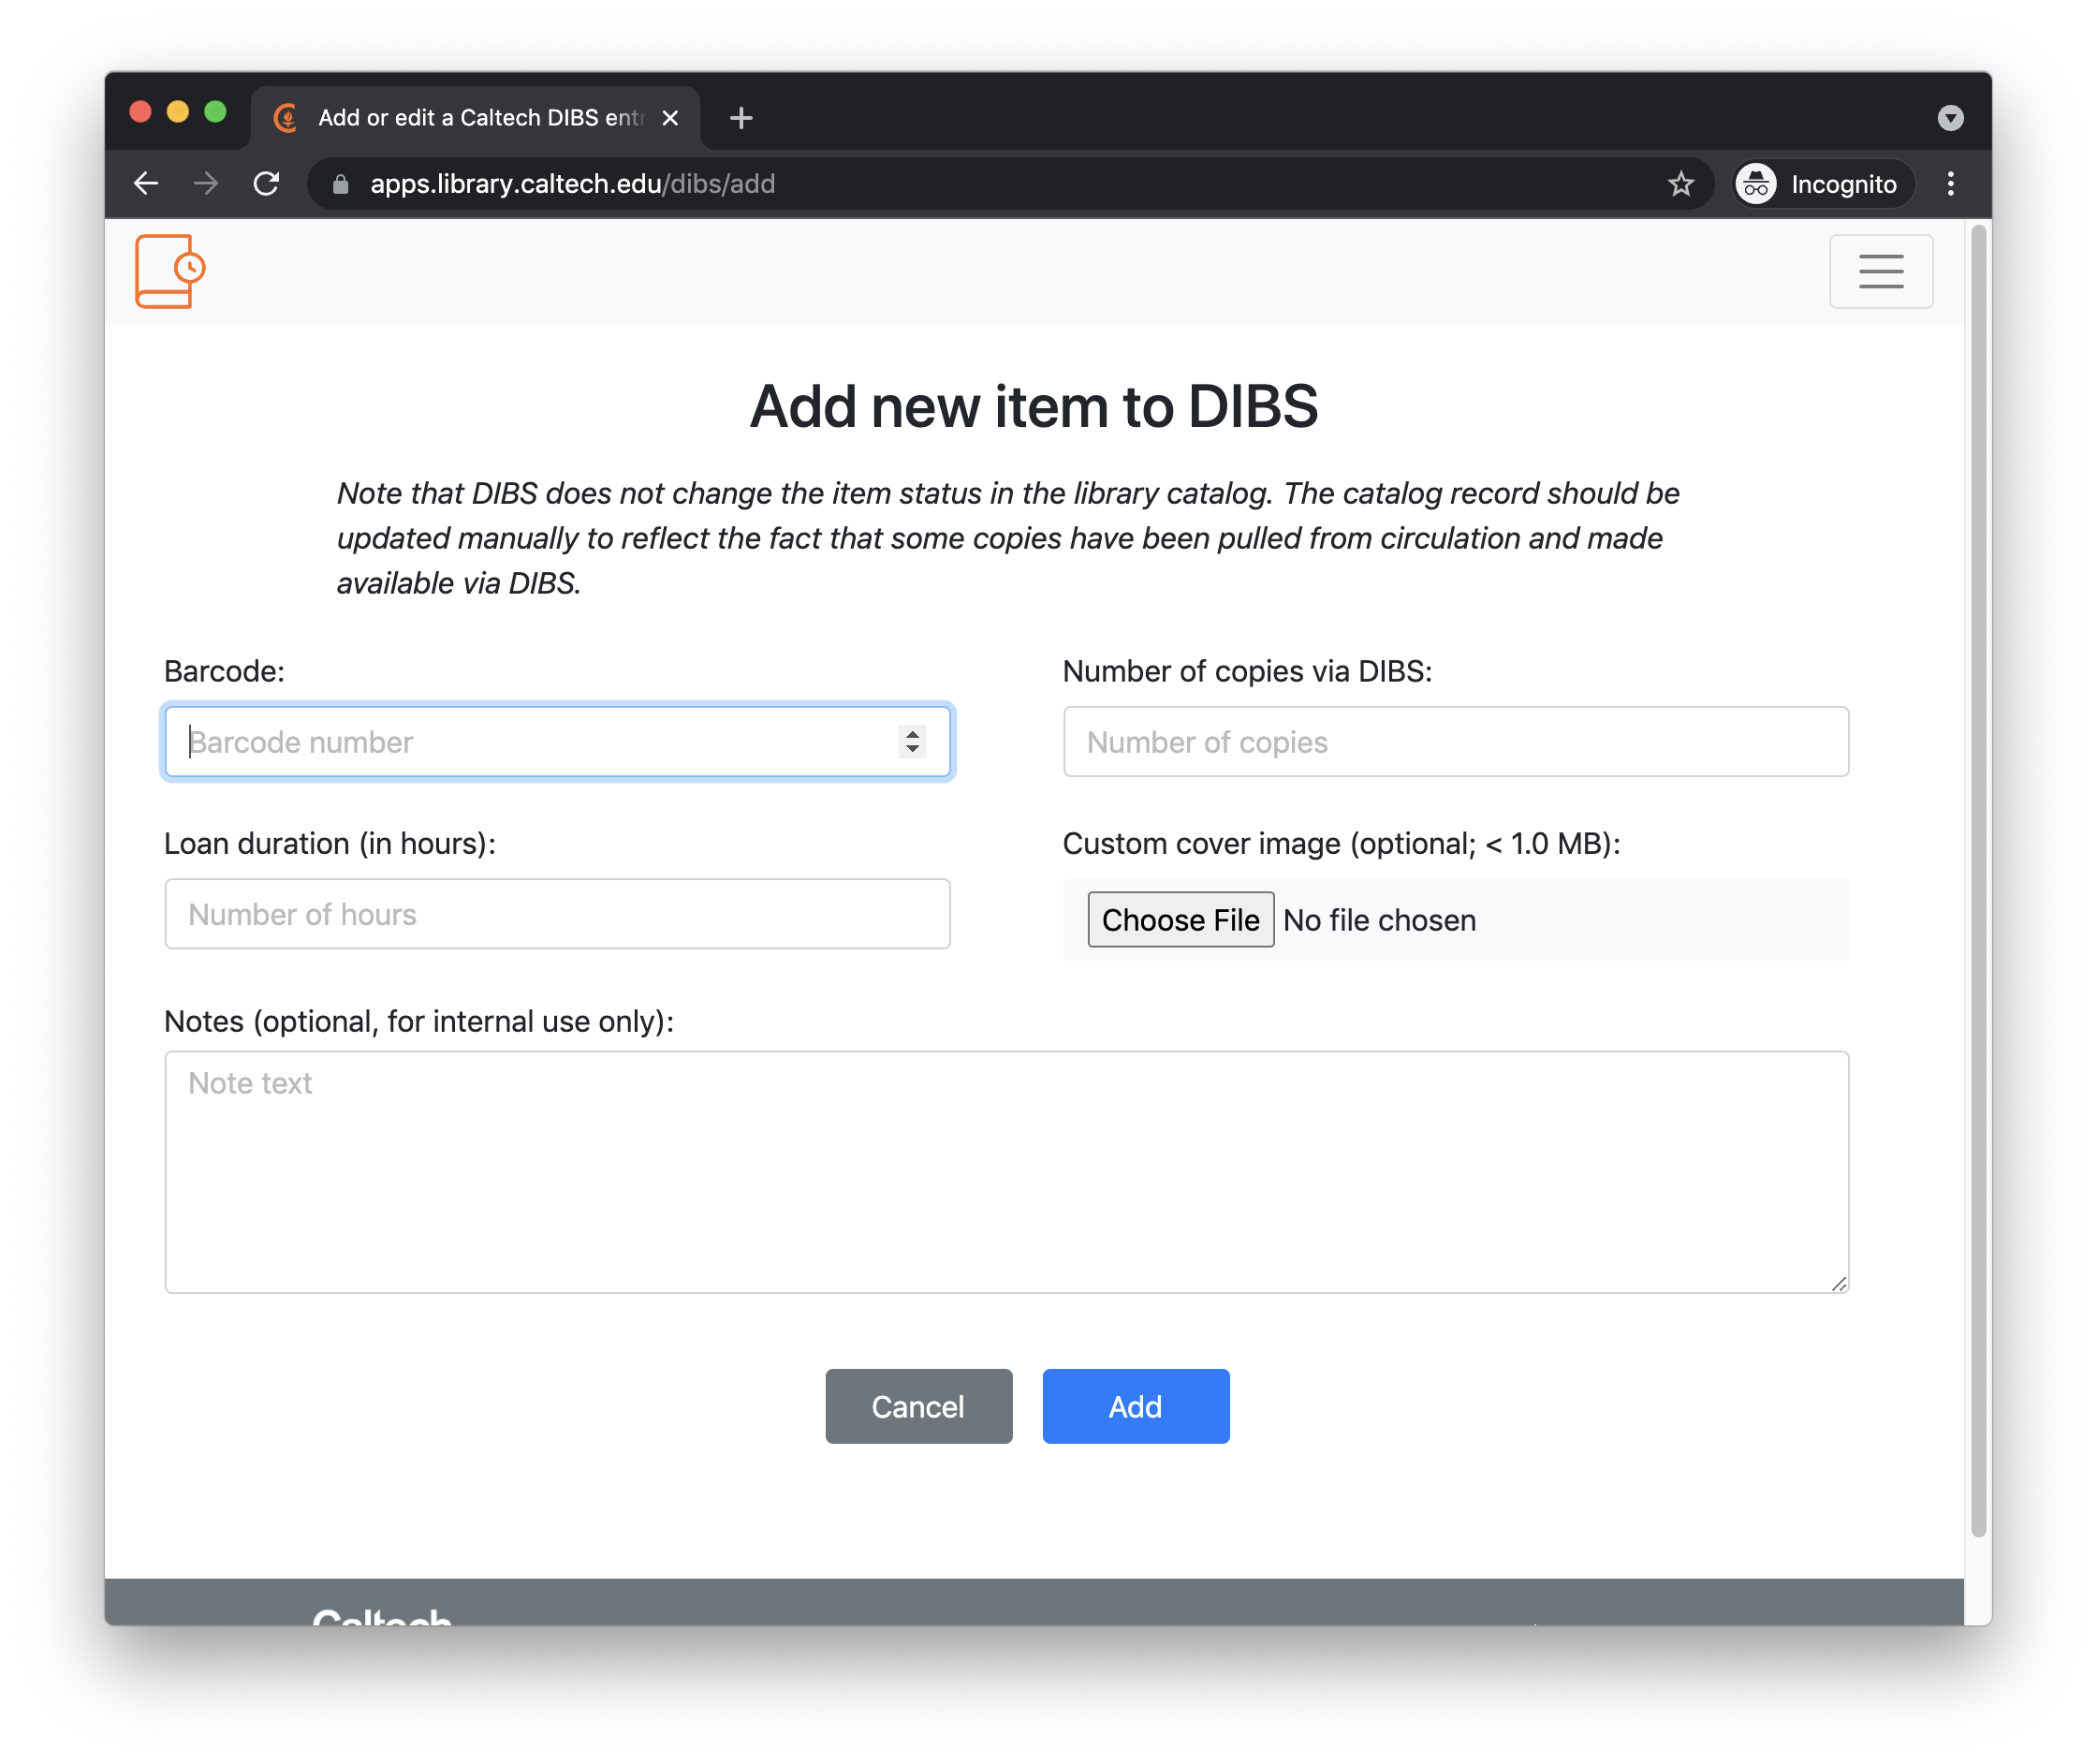
Here, information can be entered to describe a new item to be made available for digital loans. Staff only need to enter the item’s barcode, the duration of a loan, and the number of copies of the item to be made available via DIBS. Optionally, they can add internal notes as free-form text, and also, upload a custom cover image. (If the cover image is left off, DIBS will automatically try to find an image based on the ISBN obtained from the LSP.)
Note the only item-specific information needed is the barcode. All of the metadata shown about an item on other pages (such as the title, the authors, ISBN, etc.) is based on the barcode and obtained by looking up the item barcode LSP.
Editing existing items
As mentioned above, every item on the list page has a button named next to it. Clicking on this button shows a page essentially identical to the page for adding a new item, except now the fields in the form are filled in with values from the existing item being edited.
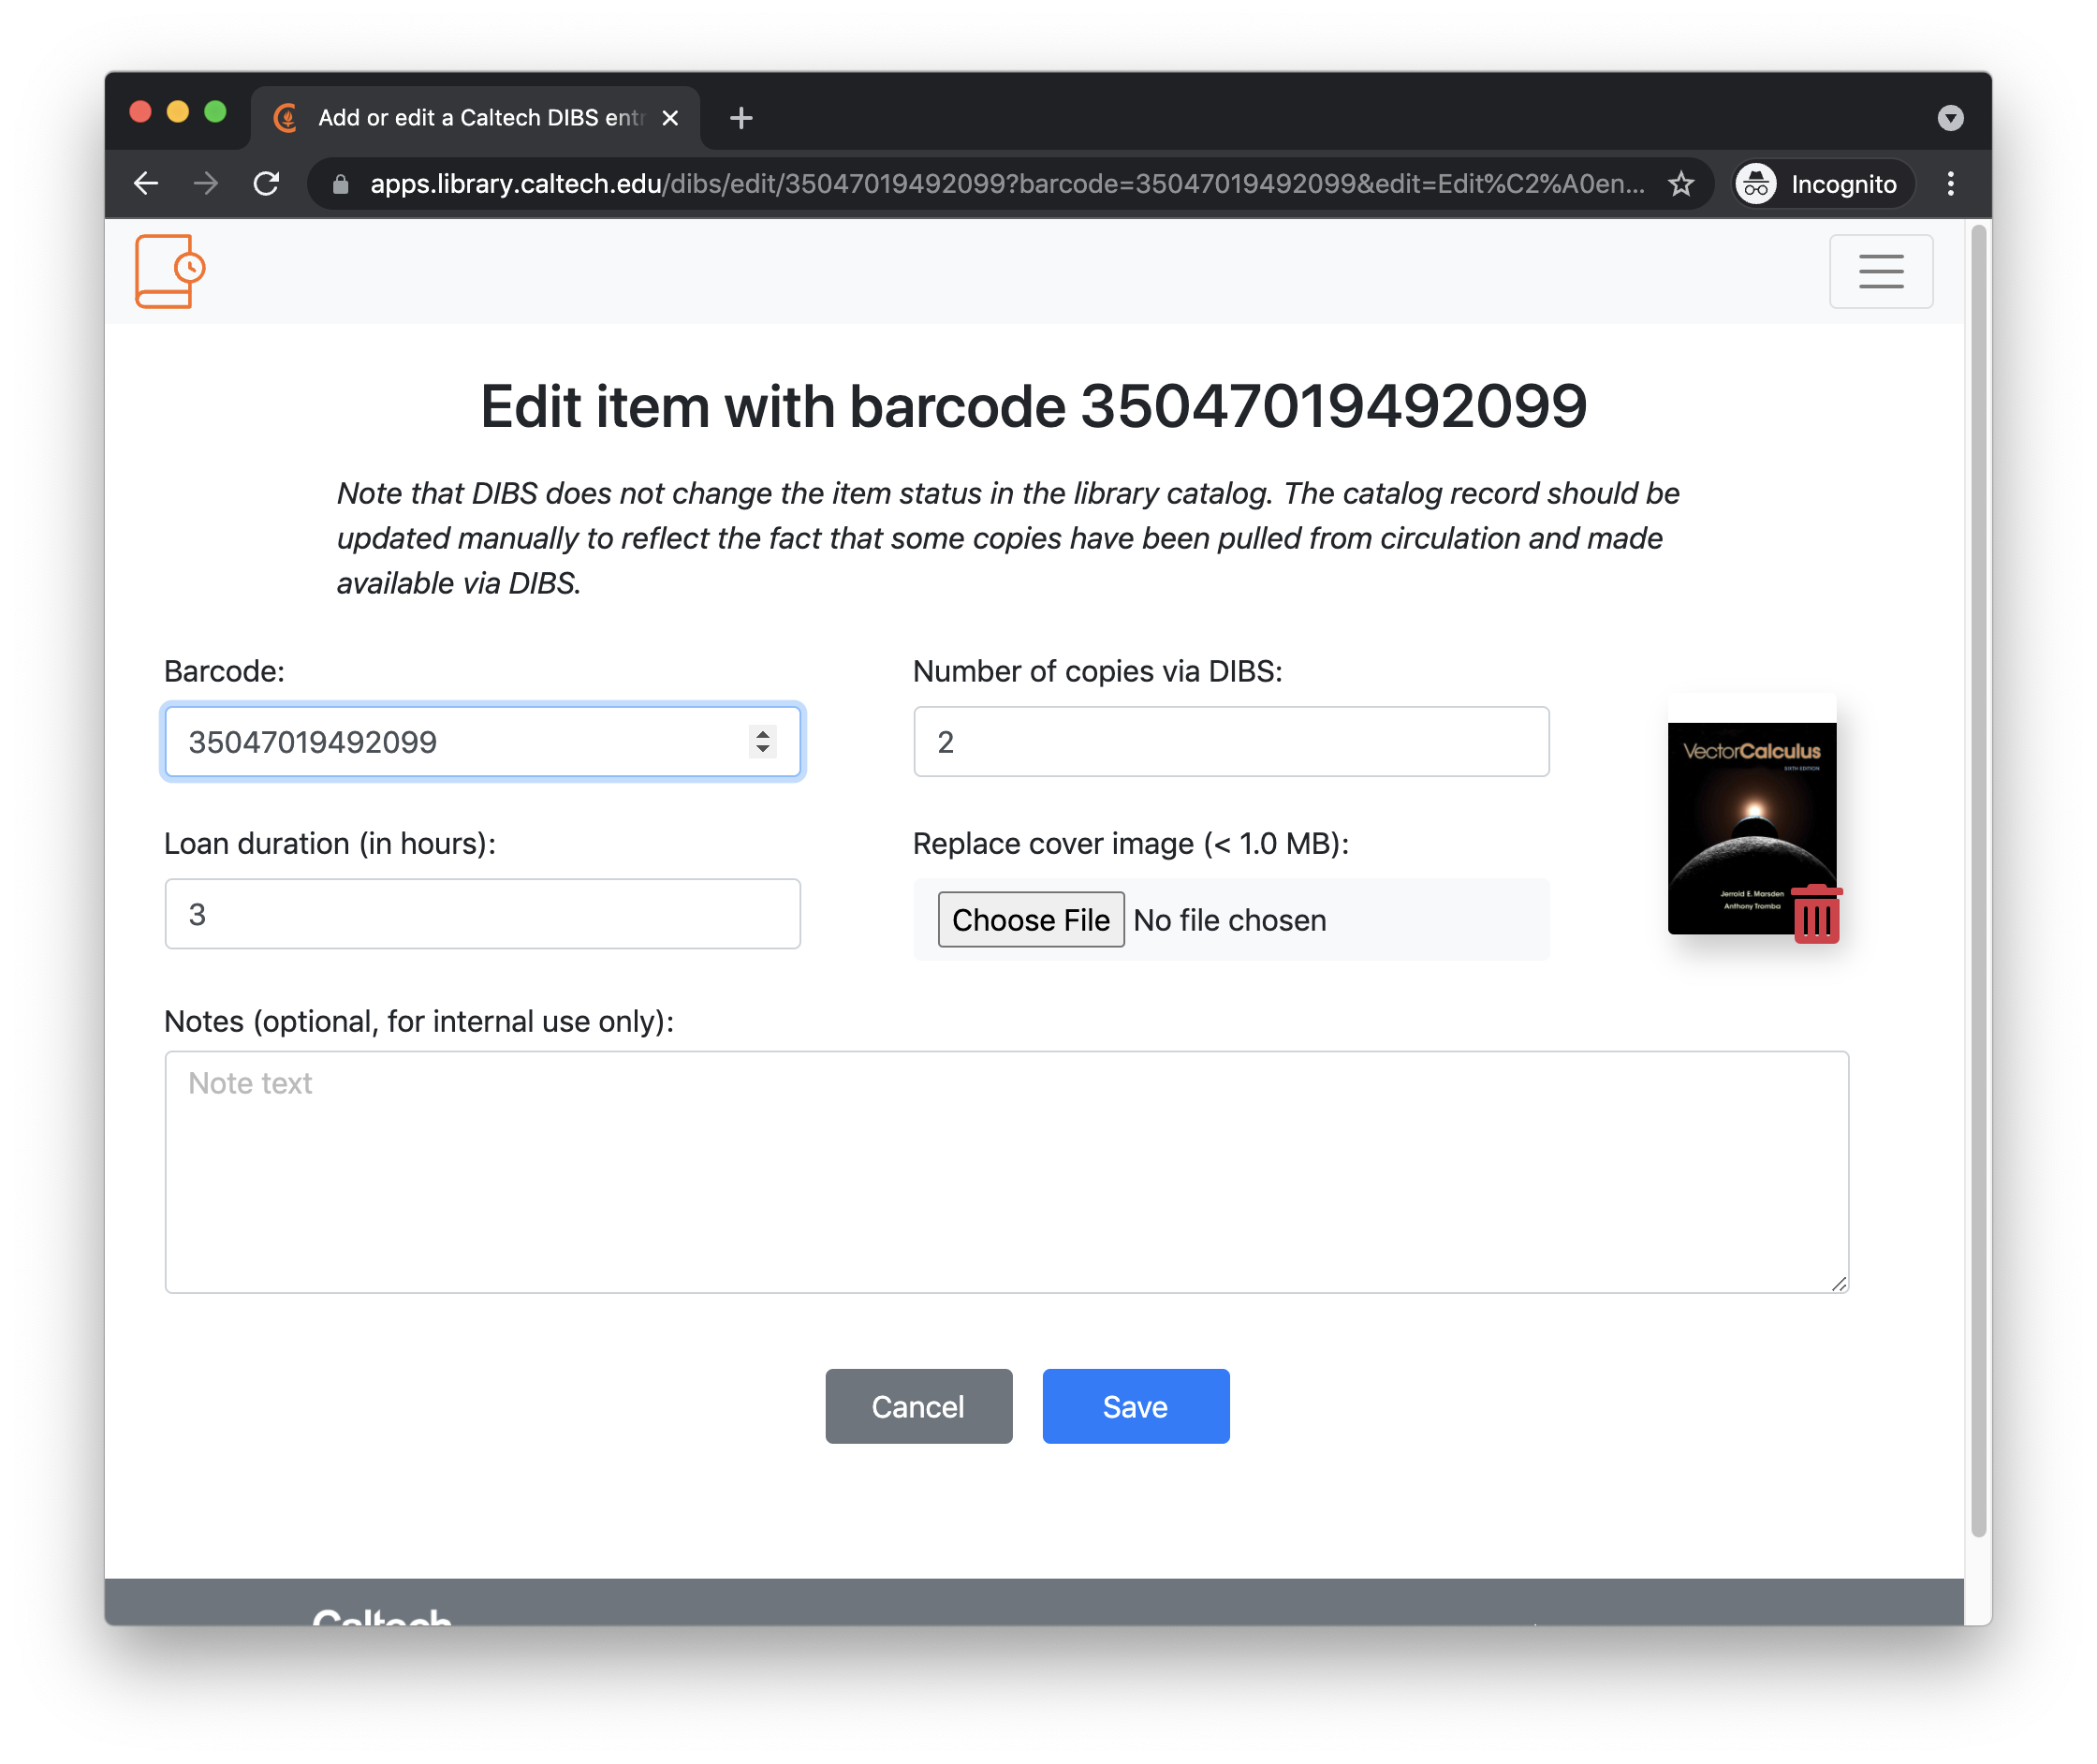
As you might have guessed, staff can modify entries by editing these values and then clicking the button to save the changes to the database.
The edit page also provides the ability to replace the item’s cover image, or to delete it altogether. When there is an existing thumbnail image, the page shows the image with a small red trashcan icon overlaid on top of it in the bottom right corner. Clicking this trashcan icon will delete the existing thumbnail image file. On the other hand, clicking the “Choose file” button under the field heading Replace cover image allows a staff user to upload an image from their computer’s hard drive; after clicking the button, the uploaded image will become the new cover image for the item.
There can arise an awkward situation when editing item entries. If you reduce the number of available copies of an item (from some number $M$ to $N$, where $N < M$), and at the time you do it, there are loans out on all available copies (all $M$), then temporarily there will be more copies loaned than the new permitted number of loans ($N$). This will persist until some loans expire; more precisely, until $M - N$ loans expire. DIBS does it this way because the alternative would be to terminate $M - N$ loans forcefully. Not only would that be frustrating for users (who would experience loans ending before the time they were promised); it would also lead to the question of how to decide fairly which loans to terminate. The current approach in DIBS is probably a reasonable tradeoff when loan durations are short, but for long loan durations (say, longer than a day), staff should make sure to wait until the number of loans has dropped to $N$ or less before putting physical copies back into circulation, to avoid the possibility that there are more digital copies on loan than have been pulled from physical circulation.
Managing the list of items
If the user clicks the button, they are presented with the following screen:
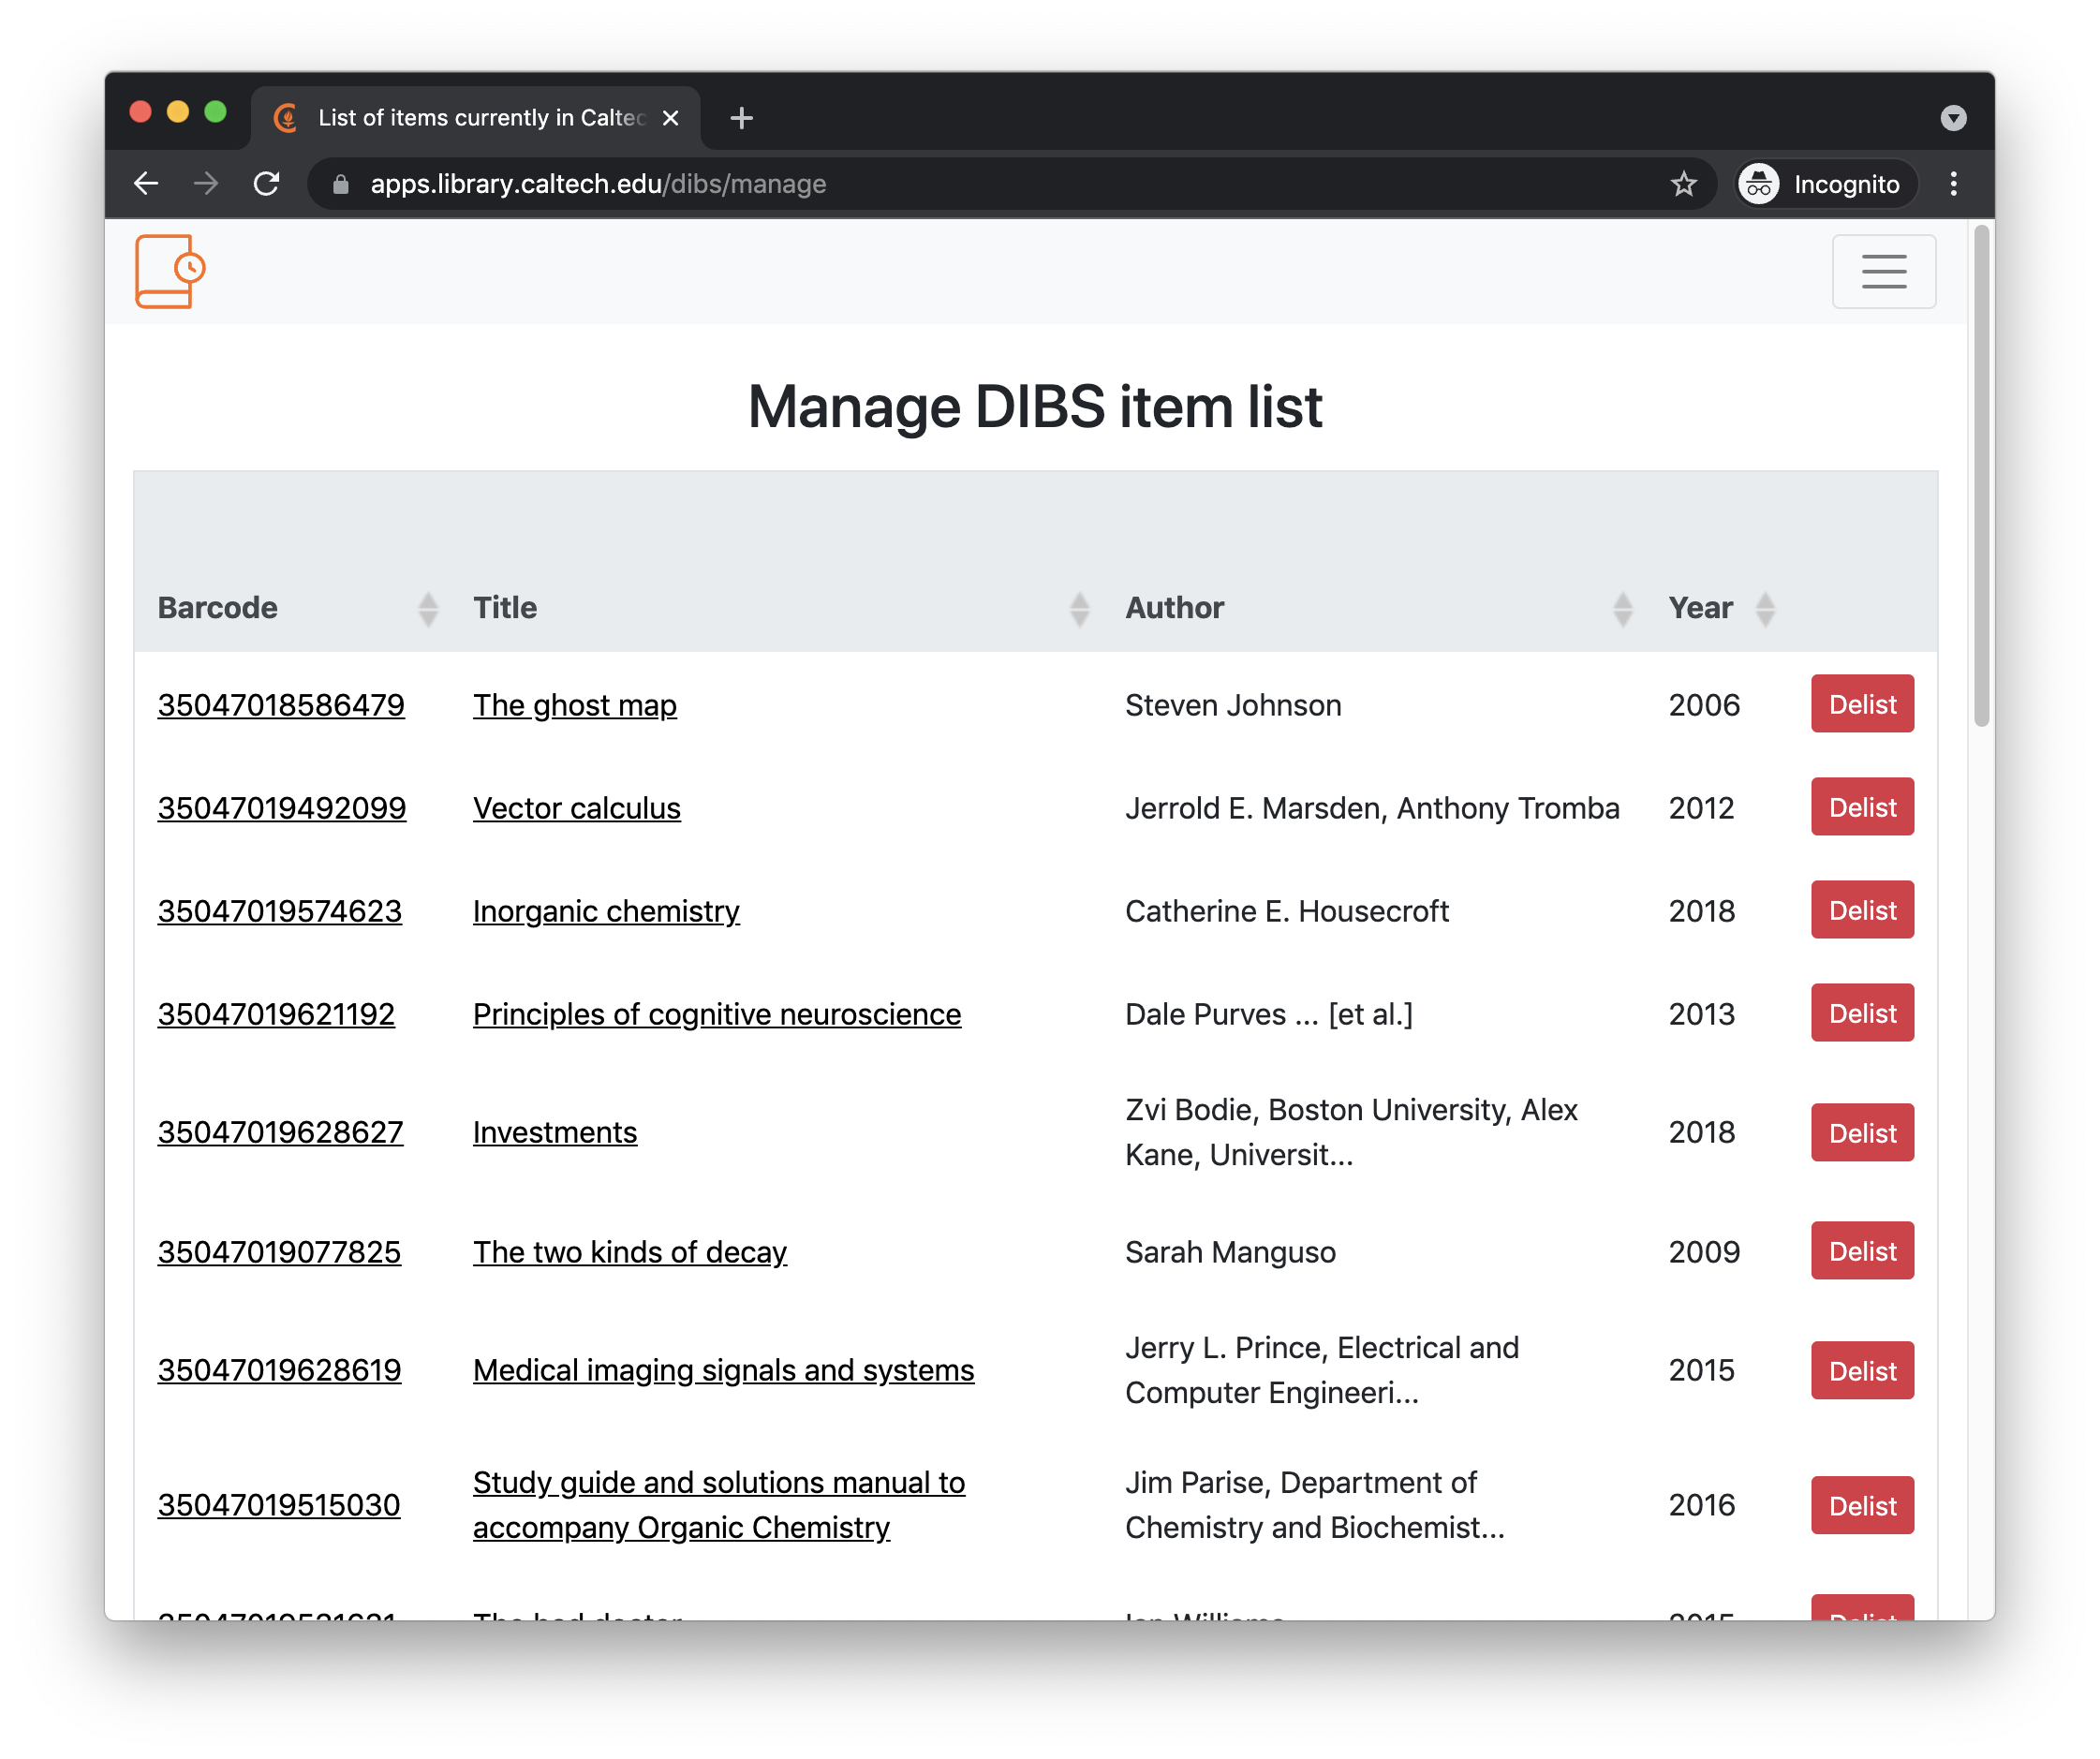
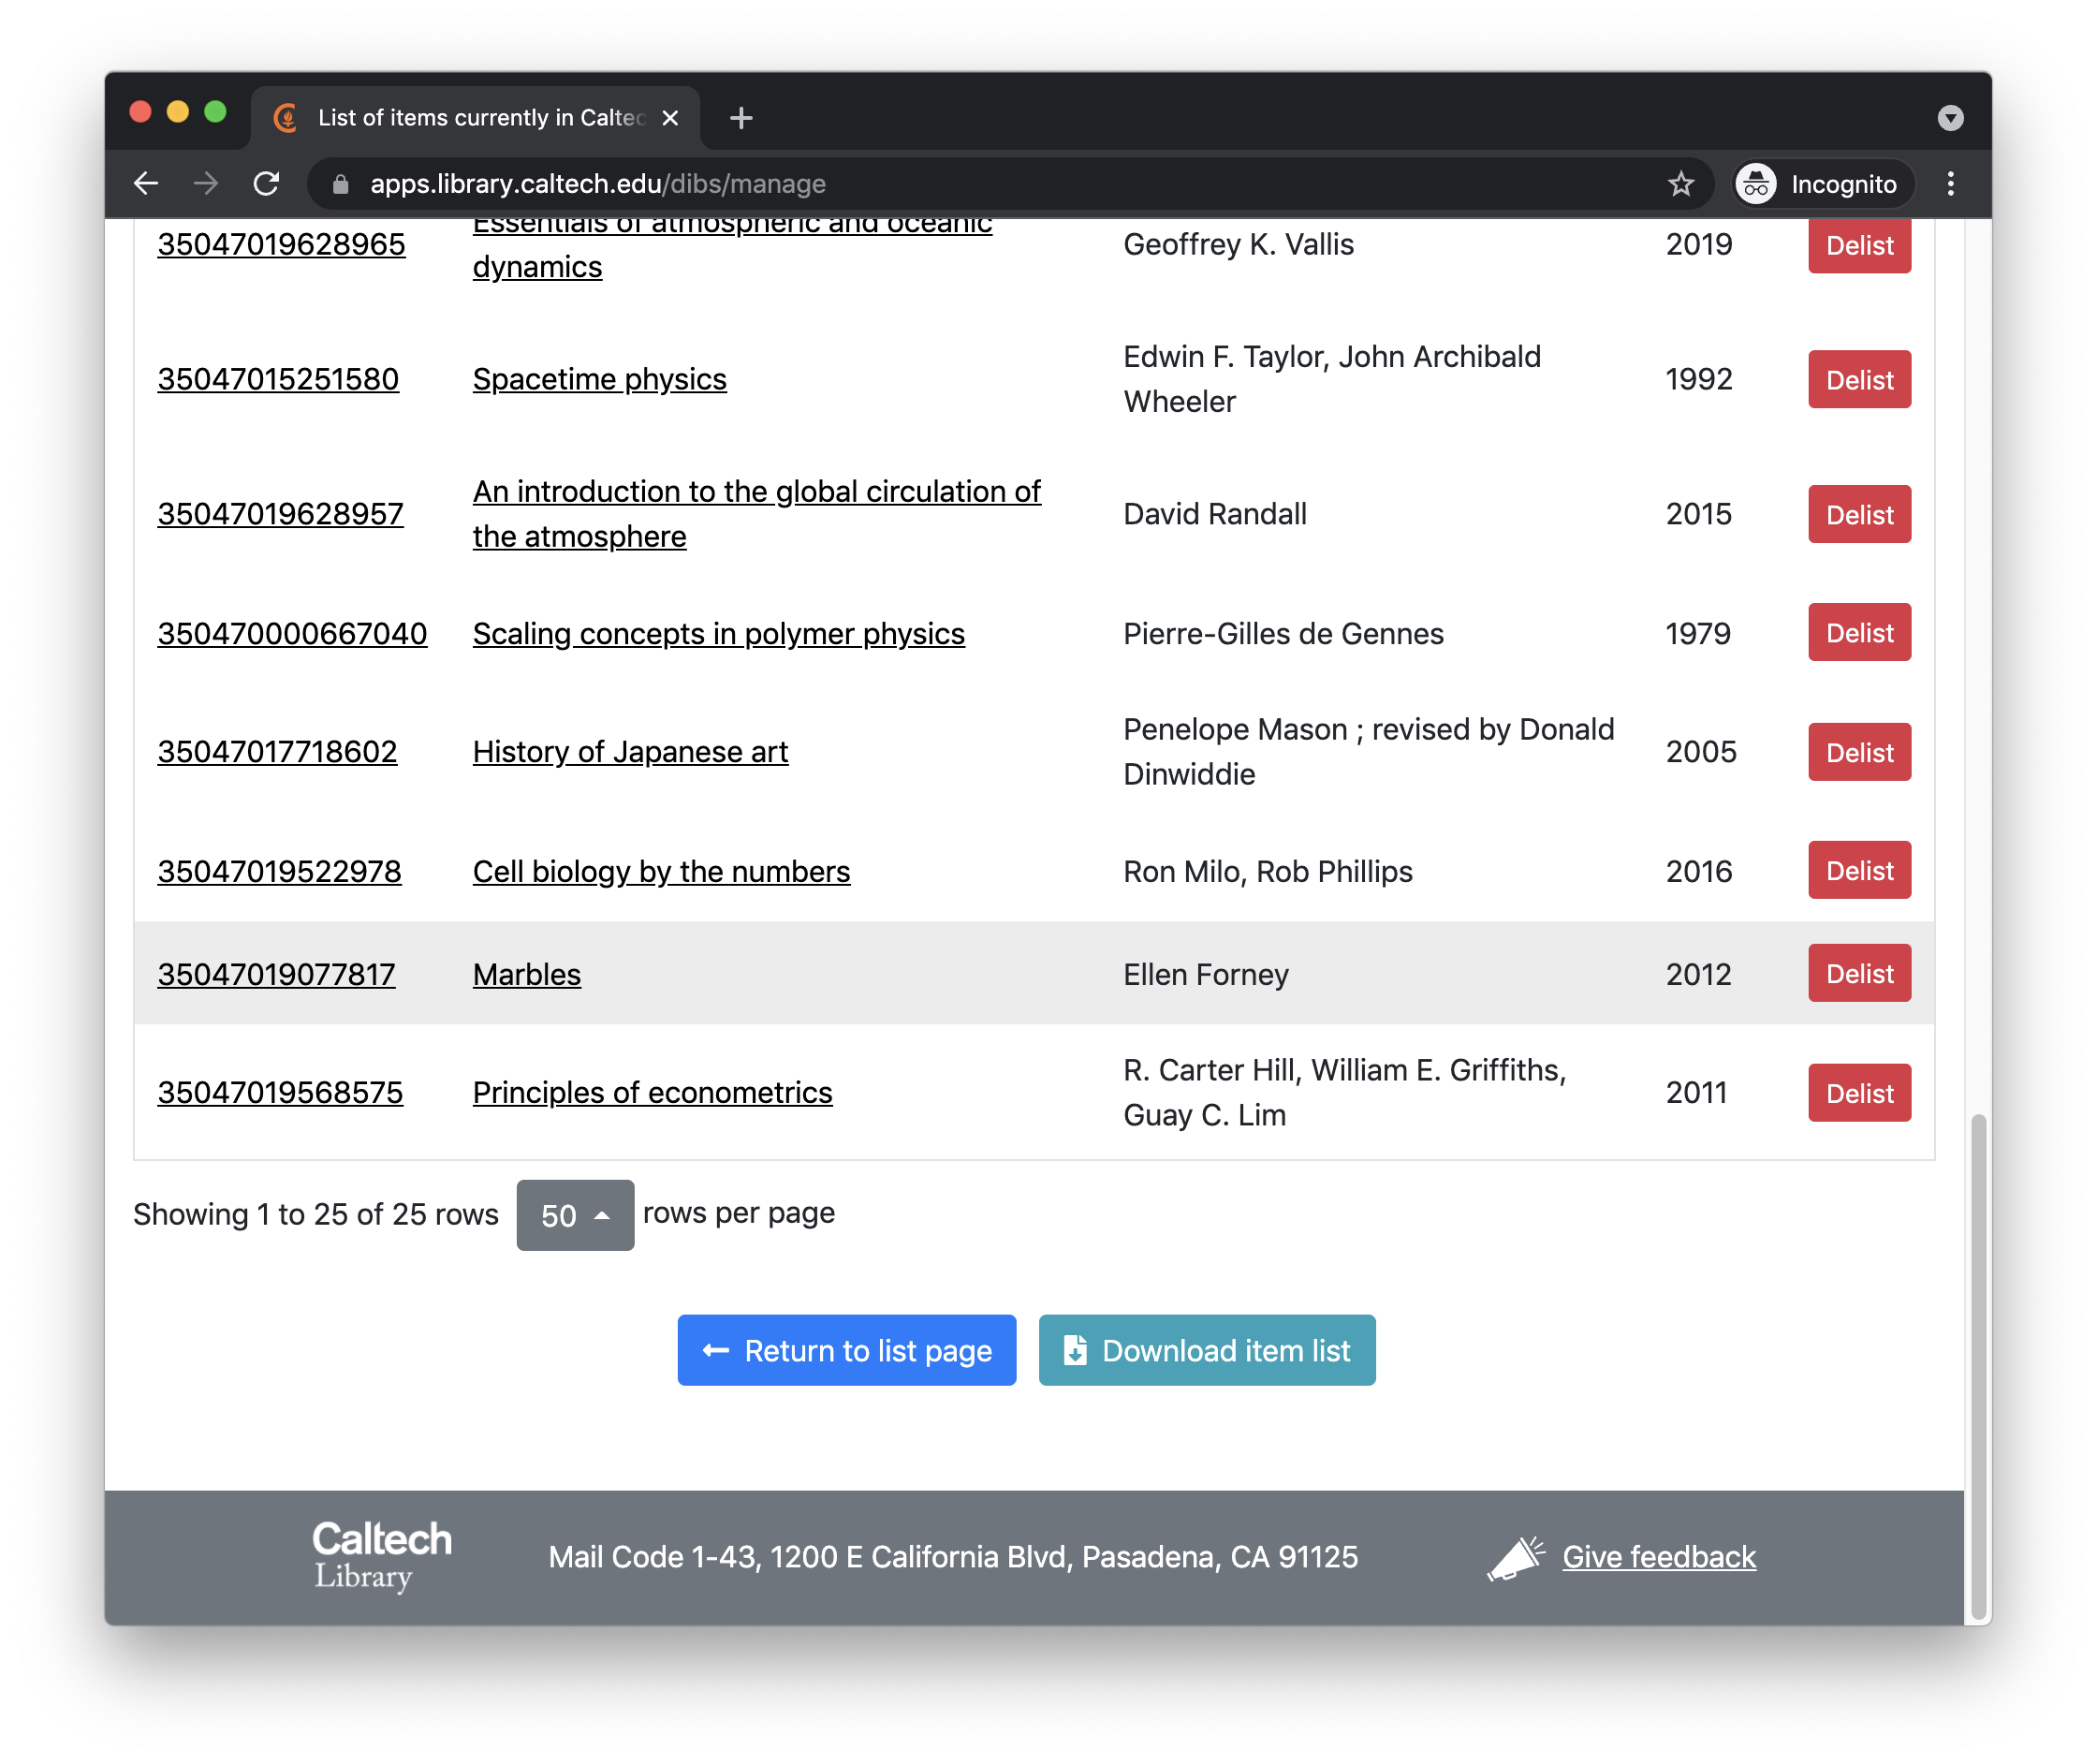
In the current version of DIBS, this page only implements two actions. One of them is the ability to remove items from the DIBS database. Clicking the button next to an item in the list removes the entry for the item in the DIBS database. (However, it does not remove the manifest, scans, or other files – it only affects the database entry.)
The second feature on the management page is a button near the bottom named . This button allows staff to download the complete list of items known to DIBS, in CSV format.
DIBS does not currently have a facility to upload lists of items in (e.g.) CSV format. A future enhancement may bring this capability. Currently, the only way to add items to DIBS is via the web interface, or command-line tools on the server.
Viewing loan statistics
DIBS offers some basic statistics on the stats page:
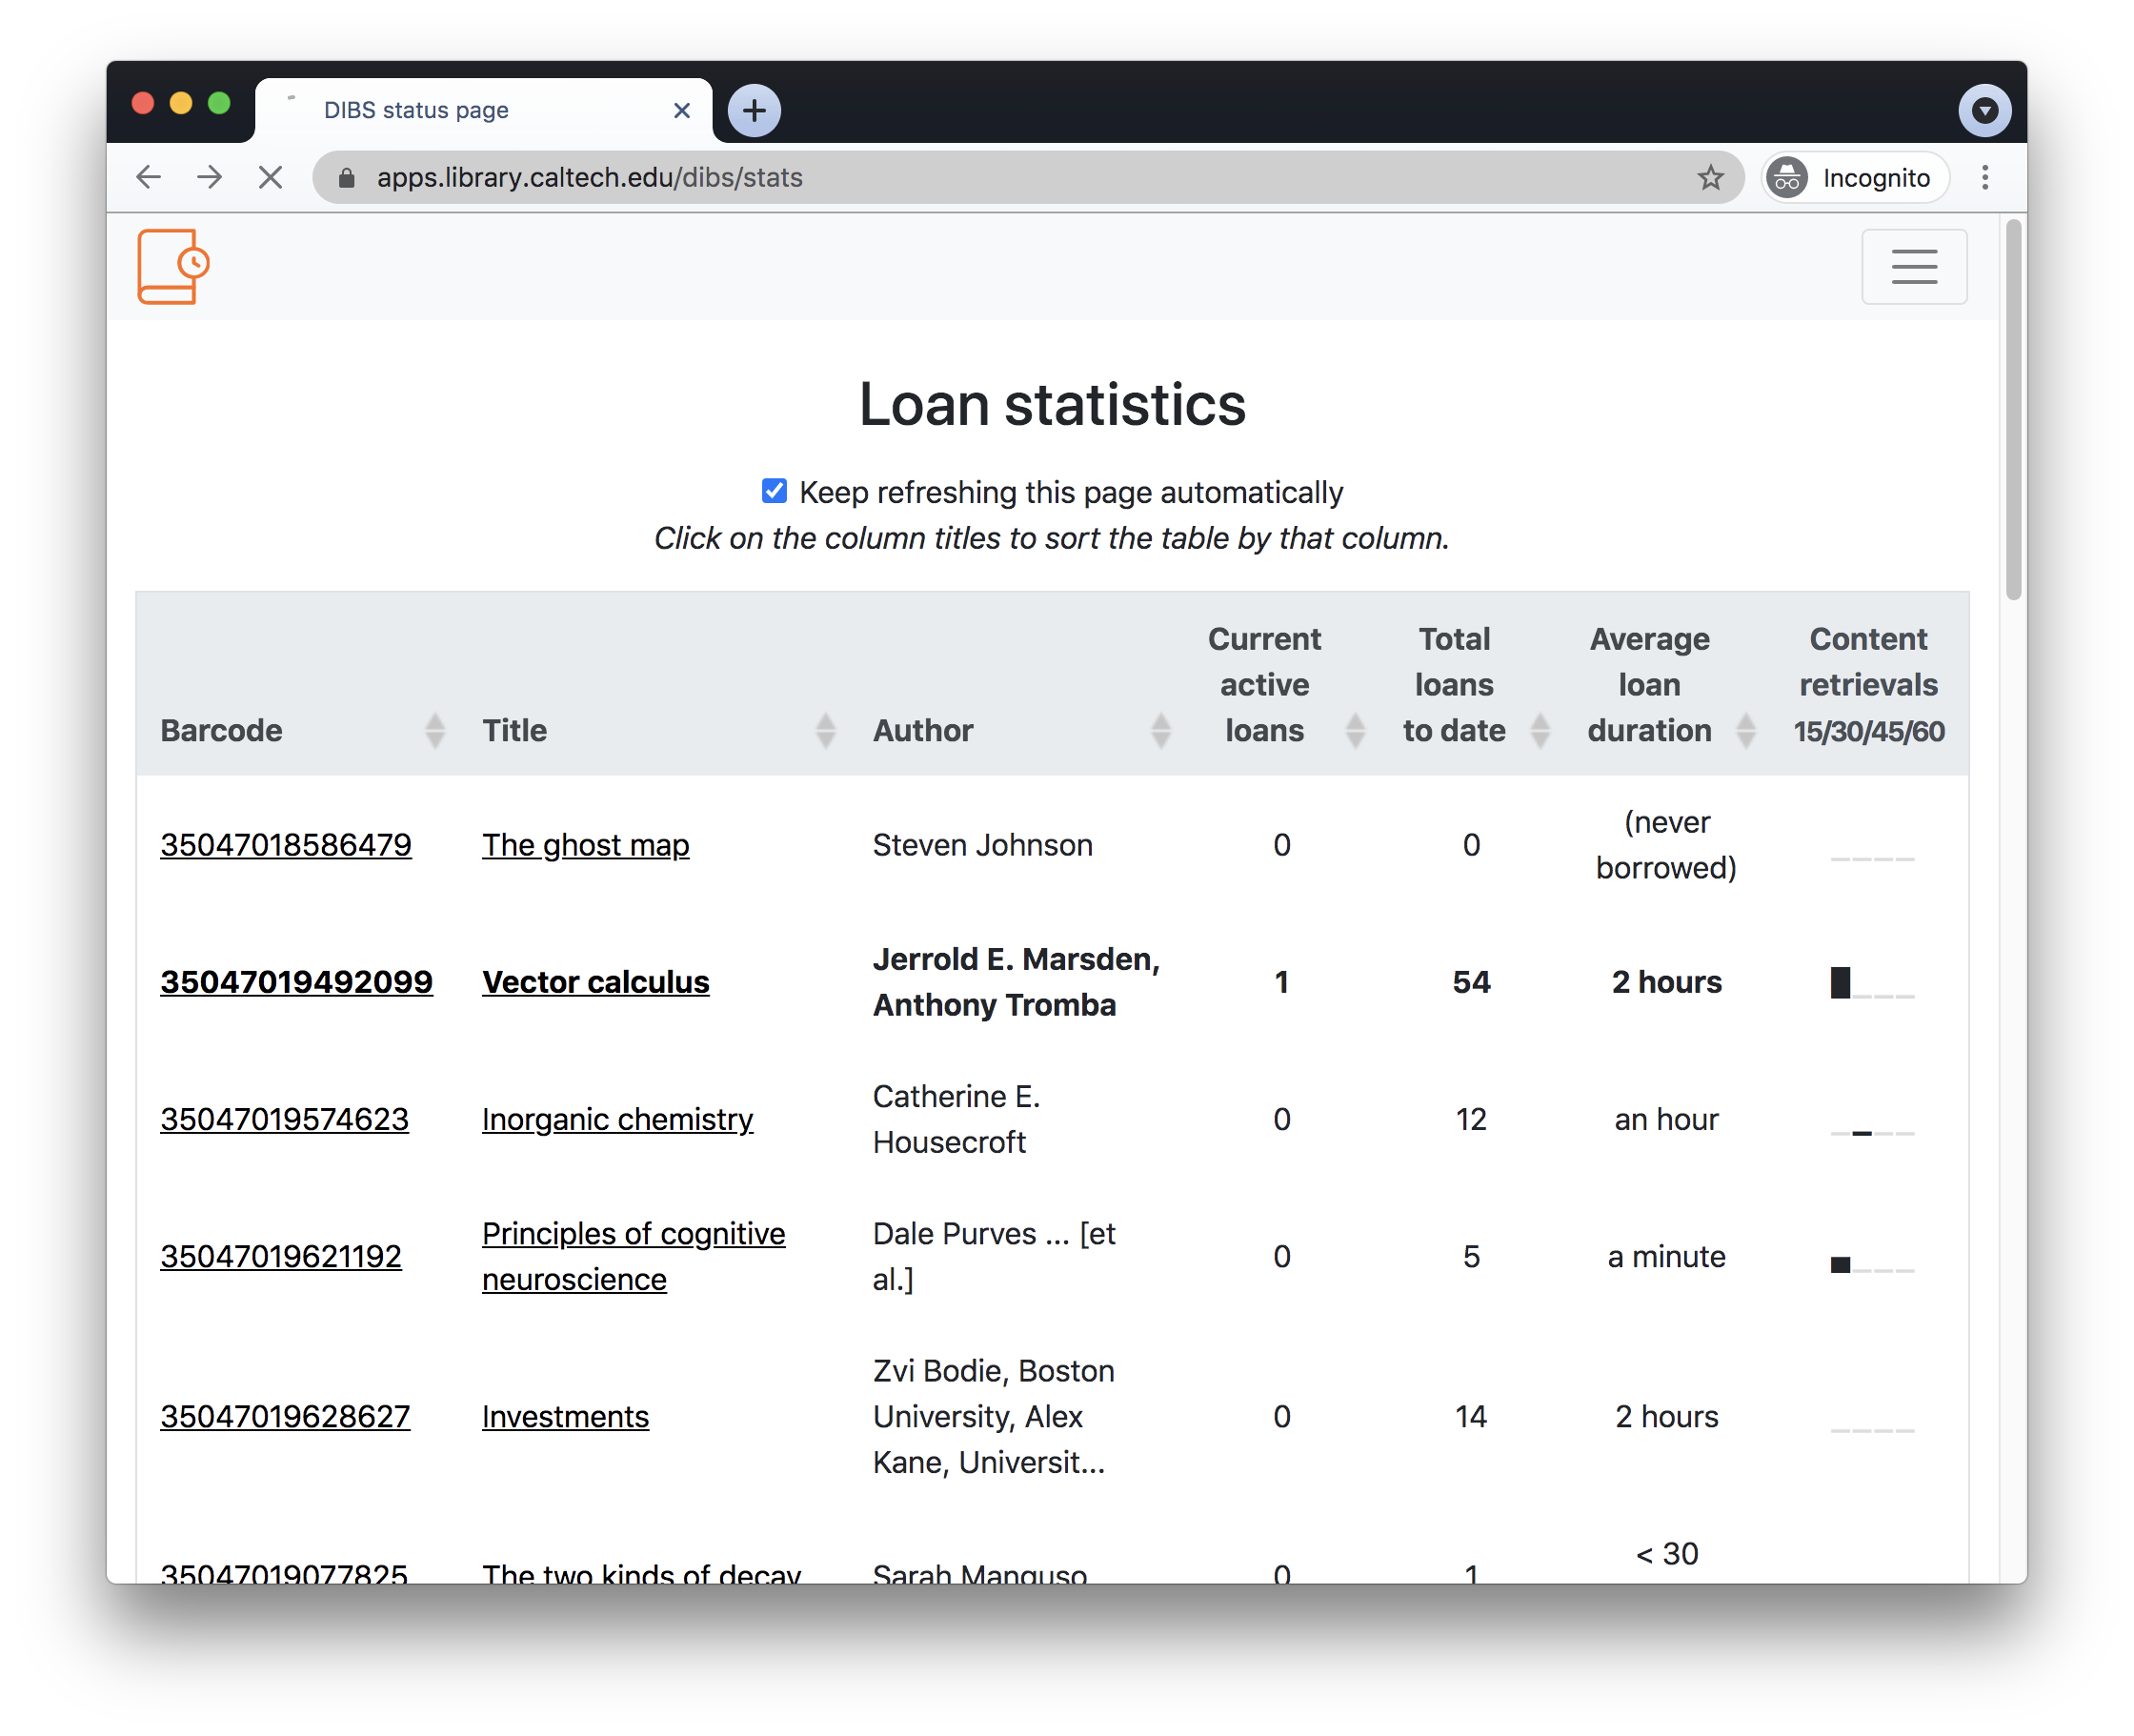
Any items currently on loan will be shown in bold face in the list. In addition, the page reports three statistics in the last three columns of the table.
Total loans to date: this is a straight count of the number of times the item has been loaned and returned. (Currently on-loan items are not added to the count until they are returned.)
Average loan duration: the mean duration of all loans for the item. If the item has never been borrowed, it is reported as “(never borrowed)”, otherwise a duration is given in general human-understandable terms.
Content retrievals: this column contains a small bar graph for each item, expressing the number of page retrievals for that item within the past 15, 30, 45 and 60 minutes. The counts change over time in a rolling fashion and are recomputed relative to the present time every time the page is refreshed. The values are intended to give a rough sense of the reader activity over the past hour for a given item.
The bottom of the stats page also offers a button named , as shown in the screenshot below. When clicked, this will cause the complete loan history to be downloaded to the user’s computer in CSV format.
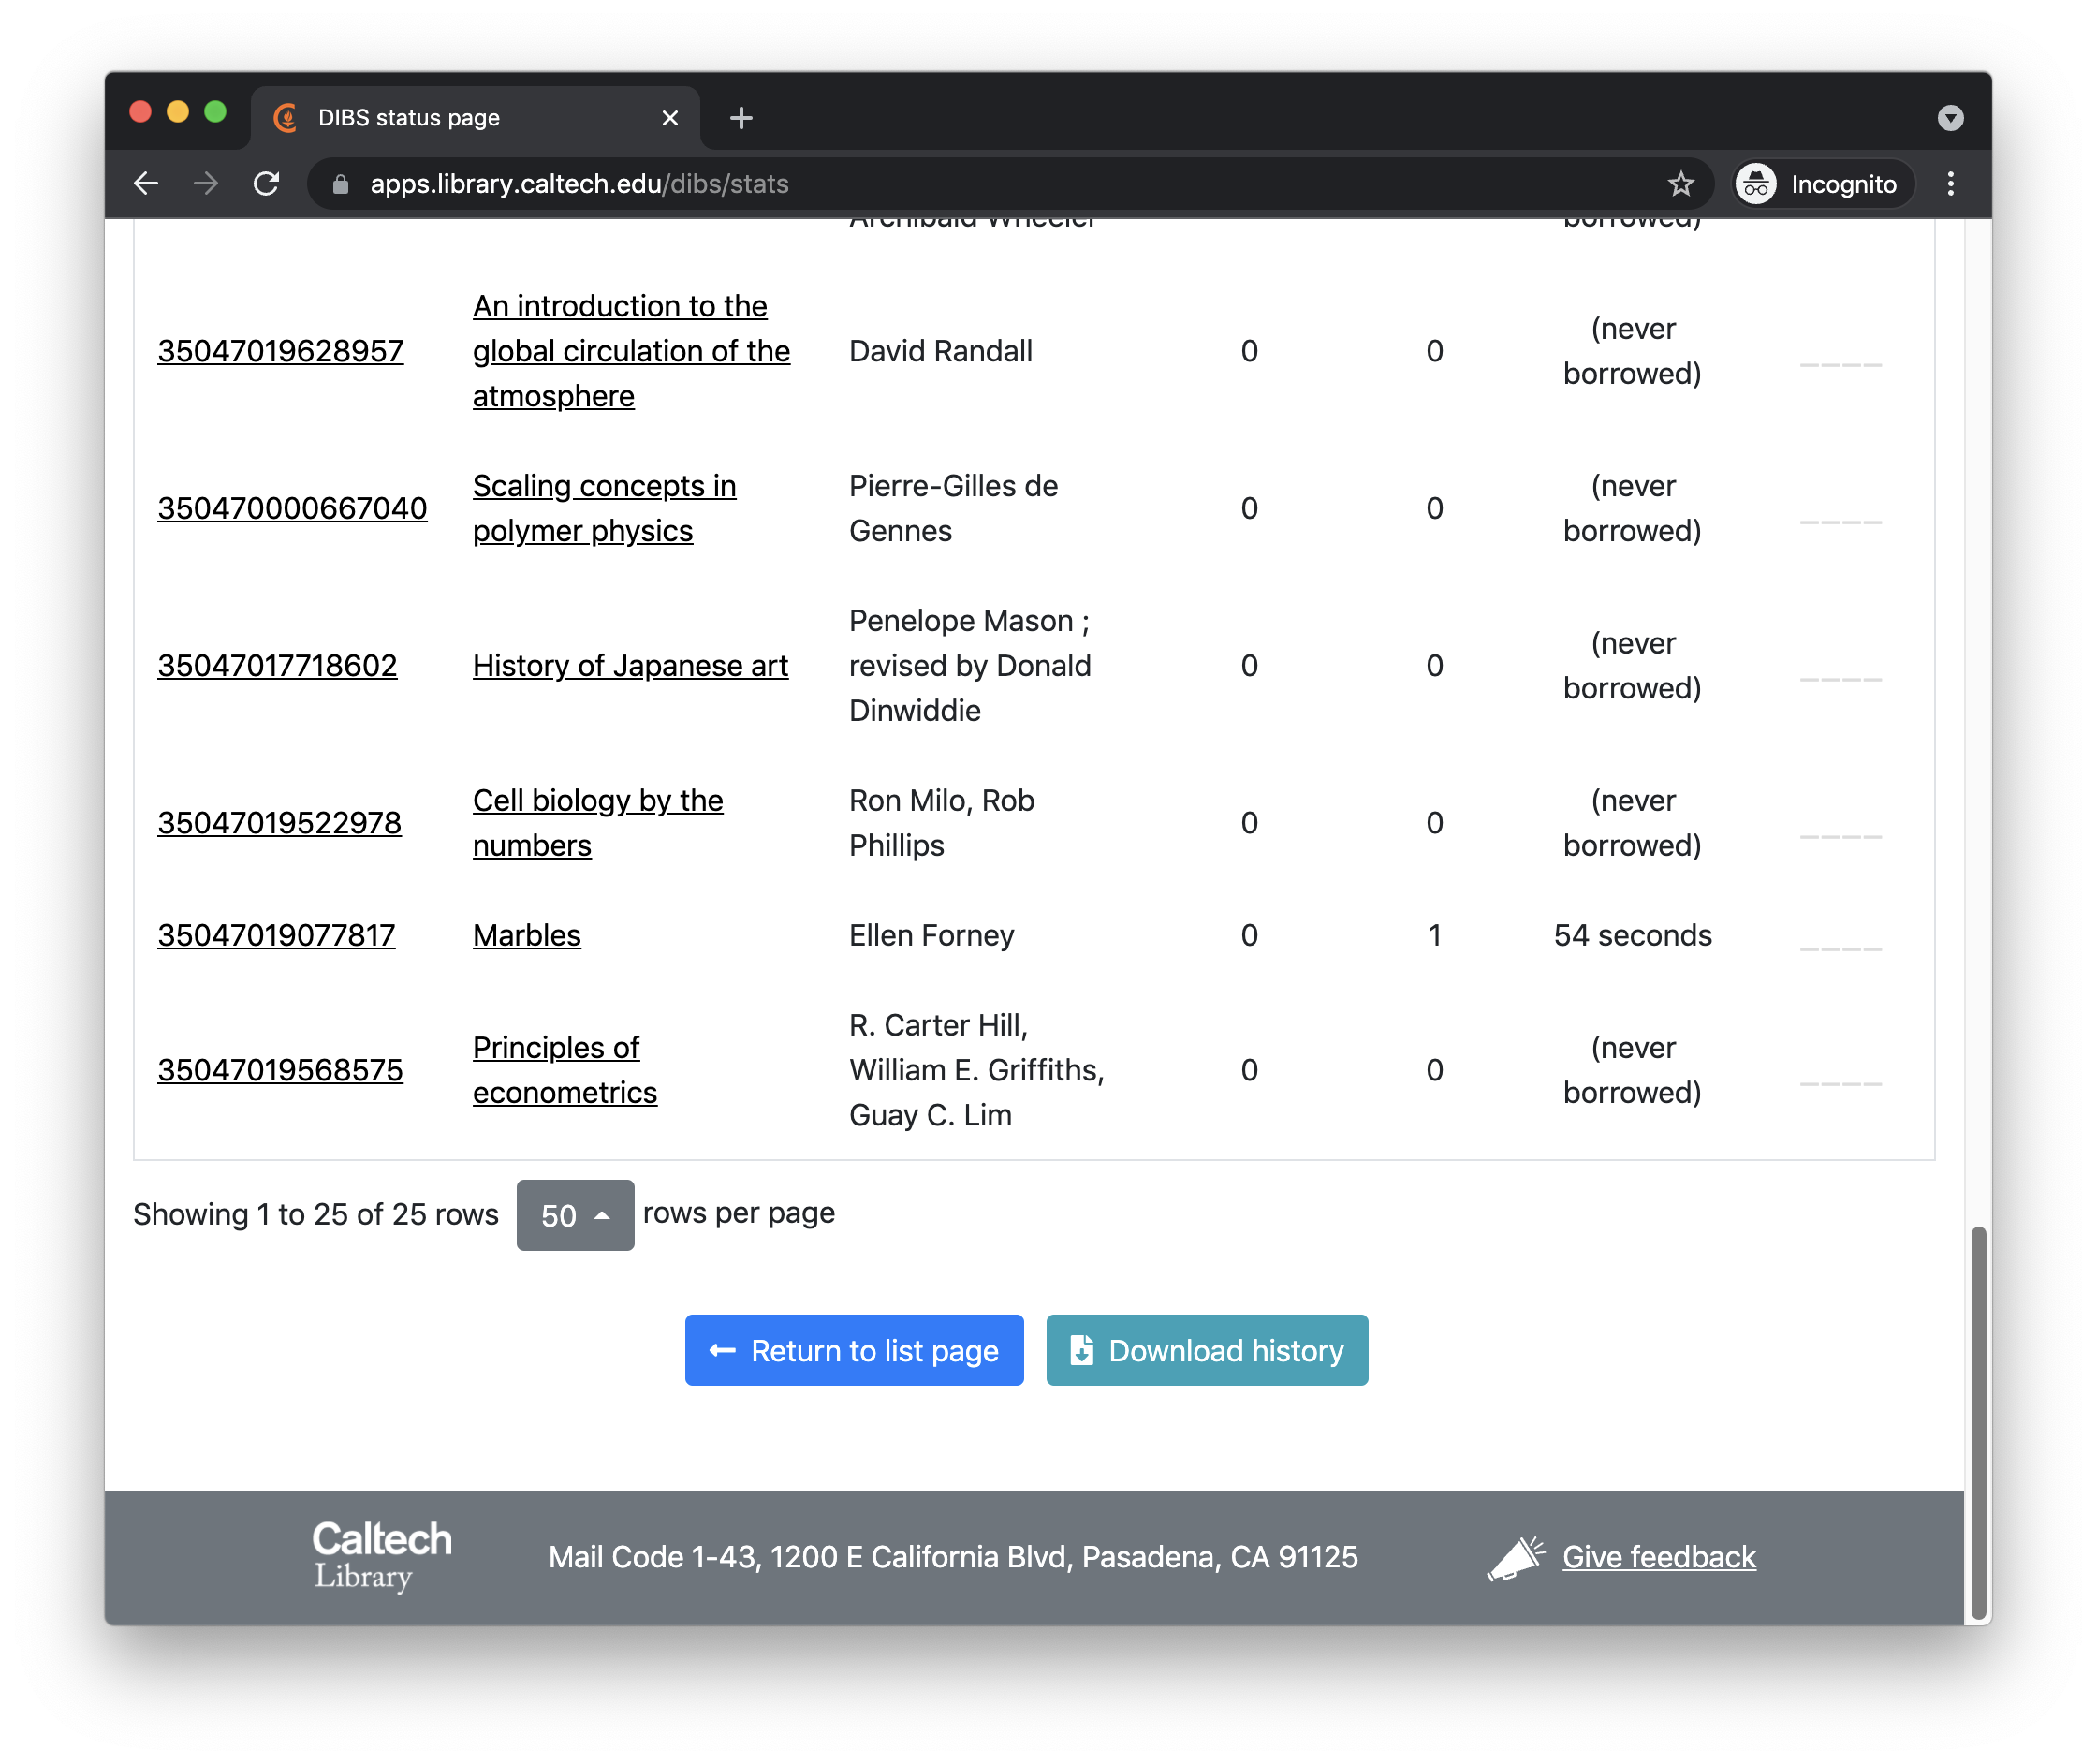
Although it’s true that the DIBS stats page offers only very basic loan statistics, the ability to download the loan history in CSV format means that users can generate additional statistics and visualizations based on the raw data.
The scanning workflow
Before a new item is to be made available through DIBS, it normally requires a workflow to be completed. This workflow involves steps such as scanning book pages, converting the scan images to a format suitable for IIIF, and more. DIBS supports this process in the following way.
After an entry is created for a new item as described above, if no IIIF manifest exists yet for that entry, then DIBS shows a button named in the column titled Available to loan? as shown in the figure below. When this button is pressed, an indicator file is created in a location where the document processing workflow looks for it. Staff do not have to press this button immediately: they can add an entry to DIBS and continue scanning pages until they are done. Once scanning is completed and the item is ready to be converted to IIIF format, then that is when staff should press the button.
Once it is initiated, the workflow runs independently and externally to DIBS and takes time to complete. Until the workflow completes or is interrupted, DIBS shows an hourglass icon in the Available to loan? column of the list page:

If an error occurred during processing, the hourglass icon will change to a stop sign, as shown in the figure below. The error symbol is for notification purposes only; DIBS does not provide an interface to take additional actions, because the underlying problem is expected to be detected by the workflow system and appropriate measures are assumed to be taken automatically outside of DIBS.

Once the workflow process has completed and a manifest file is available for the item, then the item gains the availability checkbox.