Open Science
Overview
Teaching: 5 min
Exercises: 5 minQuestions
How can version control help me make my work more open?
How can I easily preserve and share my code?
Objectives
Explain how a version control system can be leveraged as an electronic lab notebook for computational work.
Show how to preserve GitHub repos in the CaltechDATA Institutional Repository.
The opposite of “open” isn’t “closed”. The opposite of “open” is “broken”.
— John Wilbanks
Free sharing of information might be the ideal in science, but the reality is often more complicated. Normal practice today looks something like this:
- A scientist collects some data and stores it on a machine that is occasionally backed up by her department.
- She then writes or modifies a few small programs (which also reside on her machine) to analyze that data.
- Once she has some results, she writes them up and submits her paper. She might include her data—a growing number of journals require this—but she probably doesn’t include her code.
- Time passes.
- The journal sends her reviews written anonymously by a handful of other people in her field. She revises her paper to satisfy them, during which time she might also modify the scripts she wrote earlier, and resubmits.
- More time passes.
- The paper is eventually published. It might include a link to an online copy of her data, but the paper itself will be behind a paywall: only people who have personal or institutional access will be able to read it.
For a growing number of scientists, though, the process looks like this:
- The data that the scientist collects is stored in an open access repository like figshare or Zenodo, possibly as soon as it’s collected, and given its own Digital Object Identifier (DOI). Or the data was already published and is stored in Dryad.
- The scientist creates a new repository on GitHub to hold her work.
- As she does her analysis, she pushes changes to her scripts (and possibly some output files) to that repository. She also uses the repository for her paper; that repository is then the hub for collaboration with her colleagues.
- When she’s happy with the state of her paper, she posts a version to arXiv or some other preprint server to invite feedback from peers.
- Based on that feedback, she may post several revisions before finally submitting her paper to a journal.
- The published paper includes links to her preprint and to her code and data repositories, which makes it much easier for other scientists to use her work as starting point for their own research.
This open model accelerates discovery: the more open work is, the more widely it is cited and re-used. However, people who want to work this way need to make some decisions about what exactly “open” means and how to do it. You can find more on the different aspects of Open Science in this book.
This is one of the (many) reasons we teach version control. When used diligently, it answers the “how” question by acting as a shareable electronic lab notebook for computational work:
- The conceptual stages of your work are documented, including who did what and when. Every step is stamped with an identifier (the commit ID) that is for most intents and purposes unique.
- You can tie documentation of rationale, ideas, and other intellectual work directly to the changes that spring from them.
- You can refer to what you used in your research to obtain your computational results in a way that is unique and recoverable.
- With a distributed version control system such as Git, the version control repository is easy to archive for perpetuity, and contains the entire history.
Code and Data Preservation
However, GitHub is a commercial service and makes no promises that your code will be available in the future. Anyone who has tried following web links in old publications knows that it’s very easy for URLs to break. In order to fulfill the promise of open science, you need to deposit your code in data in a trusted repository - a web service that will ensure that your files are available in the future. These repositories will provide a DOI, a permanent and registered link that leads to your code or data. You should include this DOI with your publications as the link location can be updated without breaking.
If your field has a domain-specific repository, this is a good place to store
your data. You can find a good listing of subject-specific repositories at
PLOS.
A more complete list of repositories is available at
re3data
However, most code and a lot of data don’t fit in an existing repository. This is where institutional repositories like CaltechDATA come in. We’ll use CaltechDATA throughout the rest of this section, but non-Caltech users can use Zenodo, which is similar.
Setting Up Automatic GitHub Preservation
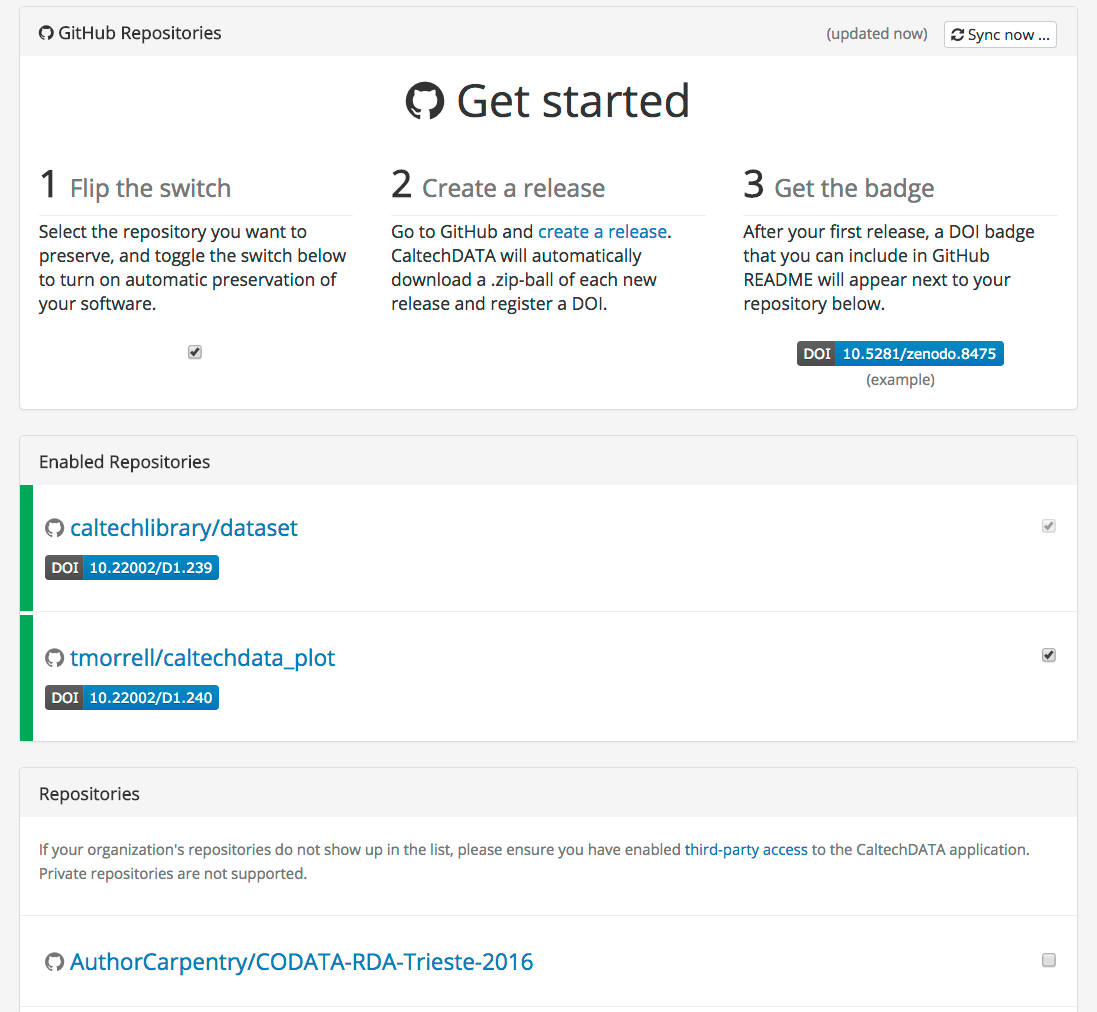
Log into CaltechDATA by clicking the Login link in the upper right-hand corner of the page. You can click the “Caltech account” link to log in with your Caltech IMSS username and password. Once you’re logged in, click on your profile (the little person icon in the upper right hand corner of the page) and select GitHub. By clicking the button and entering your GitHub username and password you can connect your CaltechDATA account to GitHub.
You will now see a list of all the repositories you have access to. In order to turn on repository preservation, click the slider to the right of the repository name. Nothing will happen just because you click the slider. This only tells CaltechDATA to watch the indicated repository for releases.
Making Releases
Releases are a good way to organize your development process. They’re a way for the scientific community to reference a specific version of your code and ensures that everyone is talking about the same thing. There are lots of ways to organize releases, but it’s easiest to make a release every time someone else might be interested in citing your code. This could be when you’re preparing a publication or have finished a new feature.
To make a release, go to GitHub and click the Releases text at the center-right of your main repository page. Then click the “Draft a new release” button on the right-hand side of the screen. You’ll need to provide a version number (use something like v0.1 prior to publication, something like v1.2.1 for changes after. See more on versioning.) You’ll also need to provide a title and description for your release.

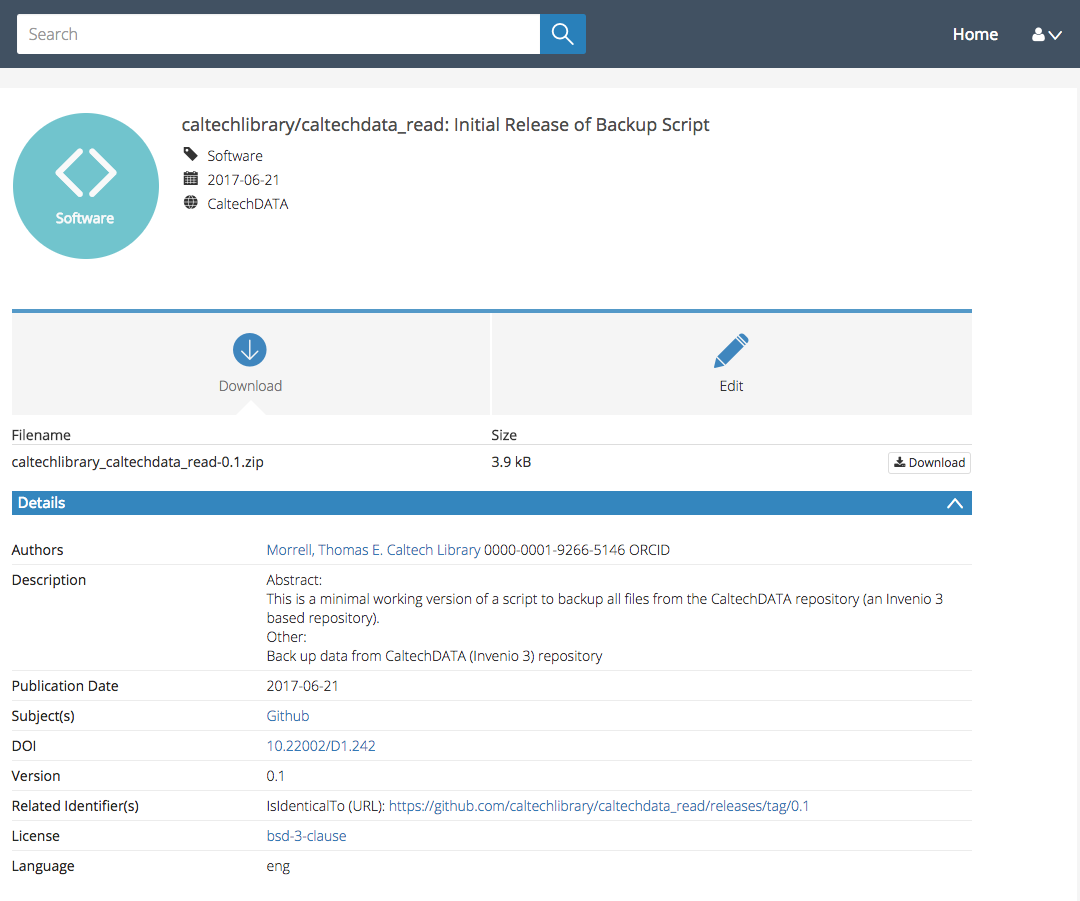
Once you click publish the magic happens! CaltechDATA notices that you have created a new release and automatically saves everything in your repository. It captures your code and files at the point of release, but does not save the full history. The release is automatically assigned a DOI, which leads to a CaltechDATA landing page. You’ll see a download link for the files, information about authors, the descriptions you wrote in GitHub, and a link back to the GitHub repo. You can edit the metadata for a record by clicking the Edit button. This is useful if you want to include more than one author, ORCID identifiers, or more links.
You also get a badge (found on the GitHub page in CaltechDATA), that you can include in your repository README file on GitHub. This will update to the newest DOI if you do additional releases.
![]()
GitHub and Data
GitHub is great for sharing and collaborating on code, but it is not set up for managing scientific data. The maximum upload file size is 100 MB, and the entire repository should be less than 1 GB. An extension to git (LFS) supports files up to 2 GB in size, but storing these files on GitHub is fairly expensive ($5 / month for 50 GB of storage). It’s better to store your data files on a disciplinary or institutional data repository. For an overview of uploading data files to a repository, see this AuthorCarpentry lesson
Key Points
Open scientific work is more useful and more highly cited than closed.
You should preserve and share your GitHub content in a scholarly repository.